
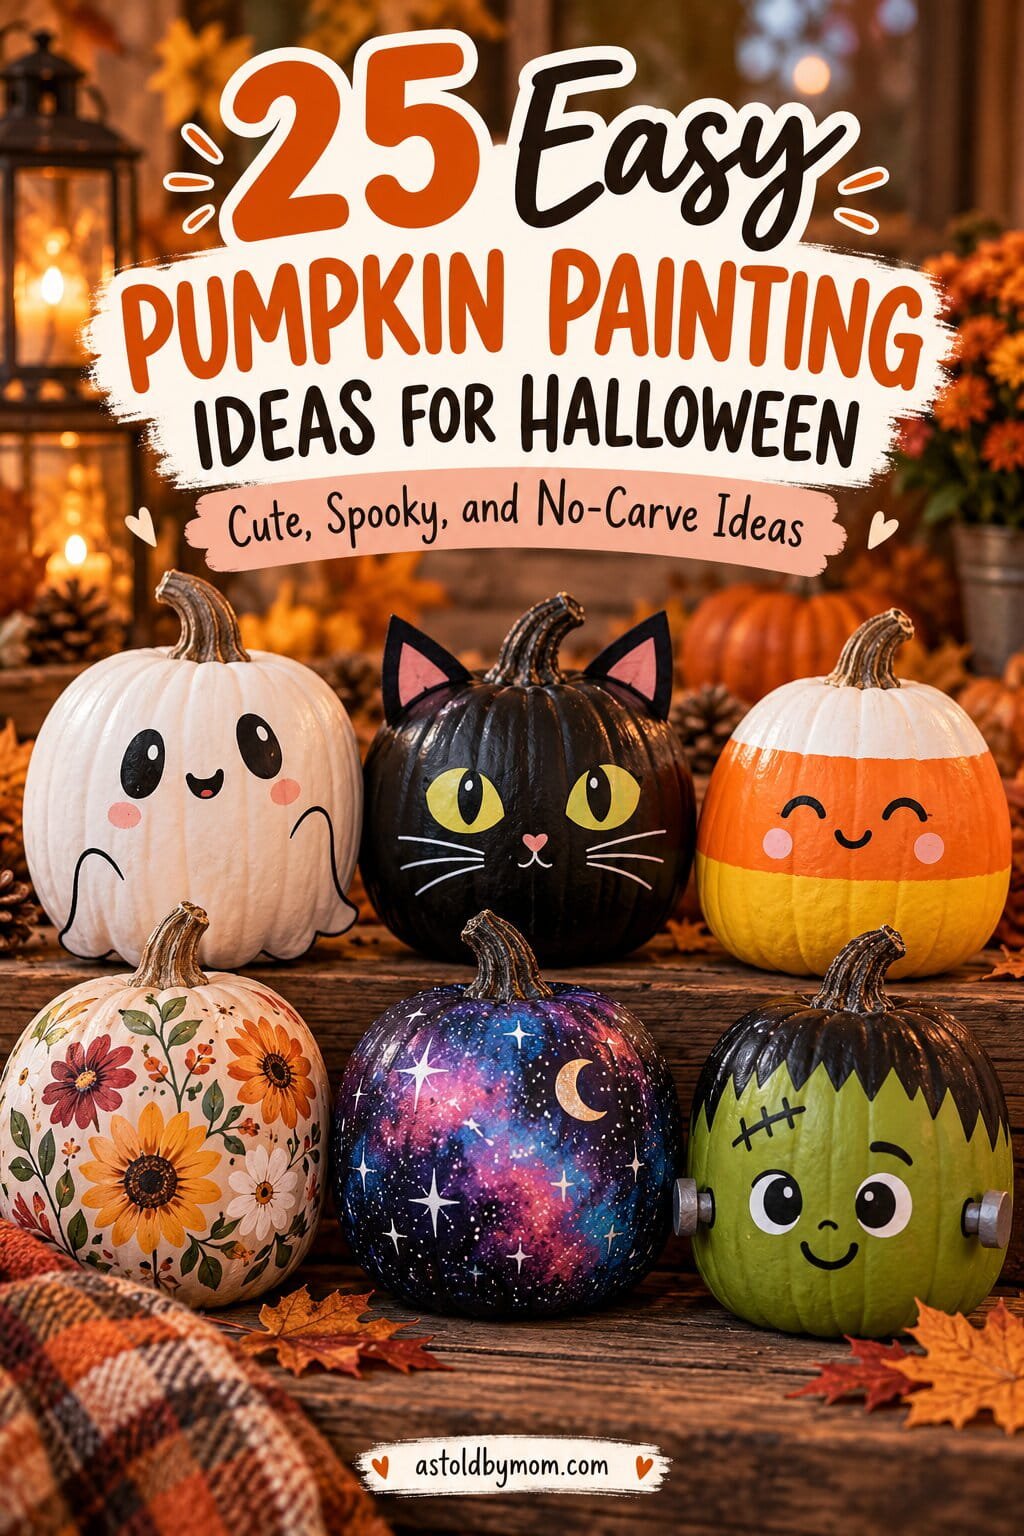
Pumpkin carving is always fun, but sometimes I want Halloween decorating without the mess of scooping out seeds and dealing with sharp carving tools. That is where painted pumpkins come in.
These easy pumpkin painting ideas are colorful, creative, and perfect for anyone who wants a fun no-carve Halloween project. Some are cute enough for kids, some have a slightly spooky Halloween look, and others are pretty enough to use as fall decor throughout the season.
You do not need to be an experienced painter either. Most of these ideas use simple shapes, basic acrylic paints, and inexpensive craft supplies.
Whether you are decorating pumpkins with the kids, planning a Halloween craft afternoon, or simply looking for something different for your porch, there should be plenty of inspiration here.
What Paint Works Best on Pumpkins?
Acrylic craft paint is one of the easiest choices for painting pumpkins. It comes in lots of colors, dries fairly quickly, and works well for both real and artificial pumpkins.
For smaller details, acrylic paint markers can make things even easier. They are especially useful for faces, stars, thin lines, lettering, and other designs that are difficult to create with a brush.
Before you start painting, wipe your pumpkin clean and make sure the surface is completely dry.
Basic Supplies for Painting Pumpkins
You will not need every supply for every project, but these are useful things to keep nearby:
- Pumpkins
- Acrylic craft paints
- Small and medium paintbrushes
- Paint markers
- Pencil
- Painter’s or masking tape
- Paper towels
- Paper plate or paint palette
- Craft glue or hot glue
- Felt or craft foam
- Googly eyes
- Sponges
- Optional glitter paint and decorative accents
Now for the fun part.
1. Cute Ghost Pumpkin
This cheerful little ghost is a great place to start because the design is simple, recognizable, and very forgiving for beginners. The white ghost looks especially cute against a traditional orange pumpkin.
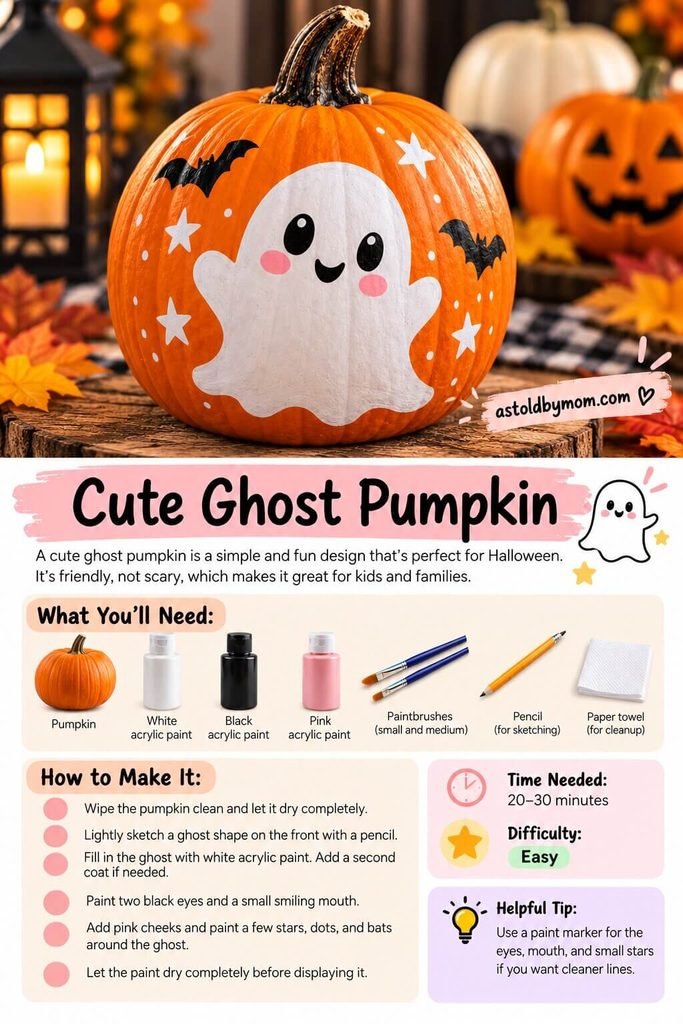
What You’ll Need
- Orange pumpkin
- White acrylic paint
- Black acrylic paint
- Pink acrylic paint
- Small and medium paintbrushes
- Pencil
- Paper towel
How to Make It
- Clean the pumpkin and allow it to dry.
- Lightly sketch a rounded ghost shape on the front.
- Fill the ghost with white acrylic paint.
- Add a second coat once the first layer dries if necessary.
- Paint two black eyes and a small smiling mouth.
- Add pink cheeks.
- Finish with little stars, dots, or tiny bats around the ghost.
Time Needed: 20 to 30 minutes
Difficulty: Easy
Helpful Tip: Use a black paint marker for the eyes and mouth if you want sharper lines.
2. Black Cat Pumpkin
A black cat pumpkin feels perfectly Halloween without being too spooky. Bright yellow eyes and a little pink nose give this one lots of personality.
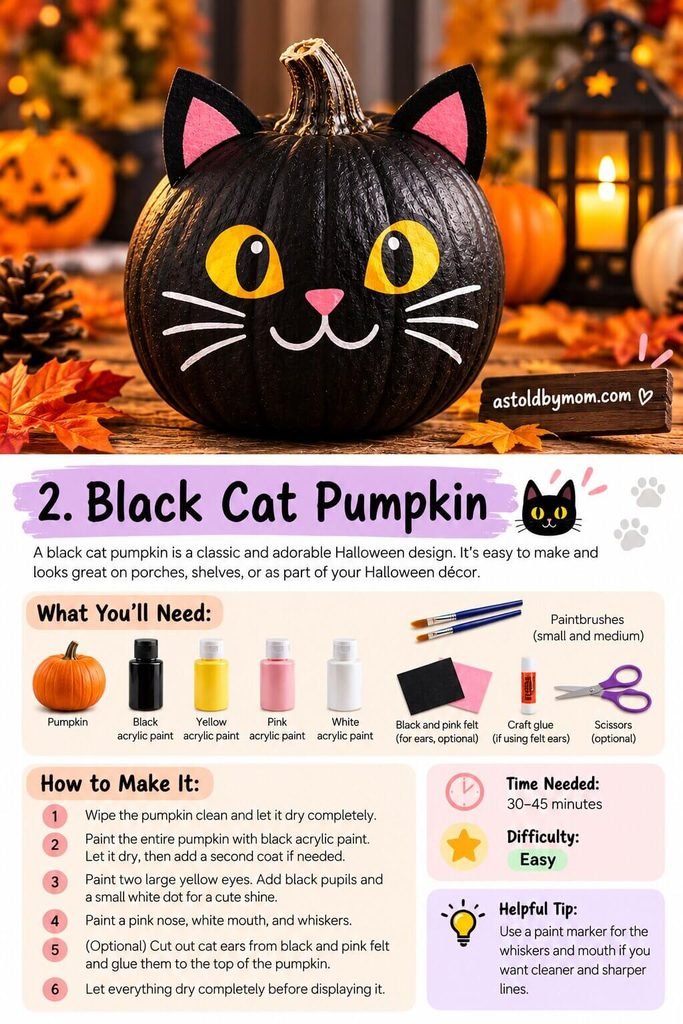
What You’ll Need
- Pumpkin
- Black acrylic paint
- Yellow acrylic paint
- Pink acrylic paint
- White acrylic paint
- Small and medium paintbrushes
- Black and pink felt or craft foam
- Craft glue
- Scissors
How to Make It
- Clean and dry the pumpkin.
- Paint the entire pumpkin black.
- Allow it to dry and apply another coat if needed.
- Paint two large yellow eyes.
- Add black pupils and tiny white highlights.
- Paint a pink nose, white mouth, and whiskers.
- Cut two cat ears from felt or craft foam.
- Glue the ears near the top of the pumpkin.
Time Needed: 30 to 45 minutes
Difficulty: Easy
Helpful Tip: Make the eyes slightly oversized for an extra-cute cartoon look.
3. Candy Corn Pumpkin
Turn your pumpkin into one giant piece of candy corn using the classic white, orange, and yellow color combination.

What You’ll Need
- Pumpkin
- White acrylic paint
- Orange acrylic paint
- Yellow acrylic paint
- Paintbrushes
- Pencil
- Painter’s tape, optional
- Paper towel
How to Make It
- Clean and dry the pumpkin.
- Divide the pumpkin into three horizontal sections.
- Use painter’s tape if you want straighter lines.
- Paint the top section white.
- Paint the middle orange.
- Paint the bottom section yellow.
- Add another coat if necessary.
- Let everything dry before removing any tape.
Time Needed: 20 to 30 minutes
Difficulty: Easy
Helpful Tip: Allow each section to dry before working close to the neighboring color.
4. Pumpkin With Googly Monster Face
This silly monster is one of the most kid-friendly pumpkin painting projects in the list. There really are no rules, which makes every monster a little different.
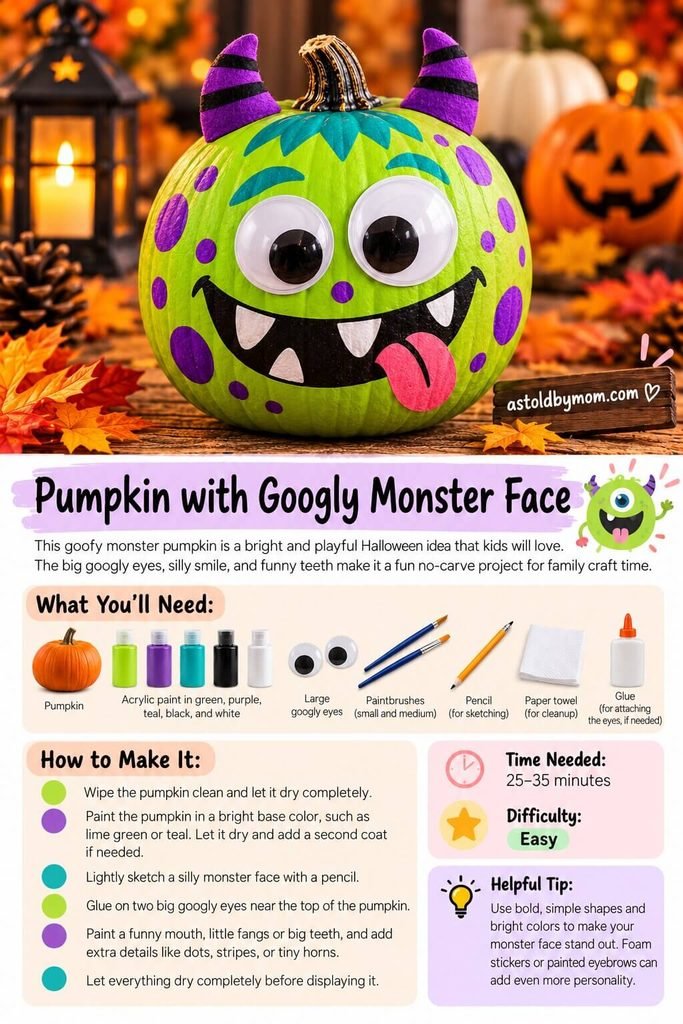
What You’ll Need
- Pumpkin
- Bright green or teal acrylic paint
- Purple acrylic paint
- Black acrylic paint
- White acrylic paint
- Large googly eyes
- Craft glue
- Paintbrushes
- Pencil
- Paper towel
How to Make It
- Clean and dry the pumpkin.
- Paint it a bright monster color such as lime green or teal.
- Let the base coat dry.
- Glue two large googly eyes near the top.
- Paint a big silly mouth.
- Add funny teeth or little fangs.
- Decorate with colorful spots, eyebrows, horns, or stripes.
Time Needed: 25 to 35 minutes
Difficulty: Easy
Helpful Tip: Let kids invent their own monster features instead of trying to make every pumpkin match.
5. Unicorn Pumpkin
Pastel colors, sleepy eyelashes, flowers, and a golden horn transform a basic pumpkin into a magical unicorn.
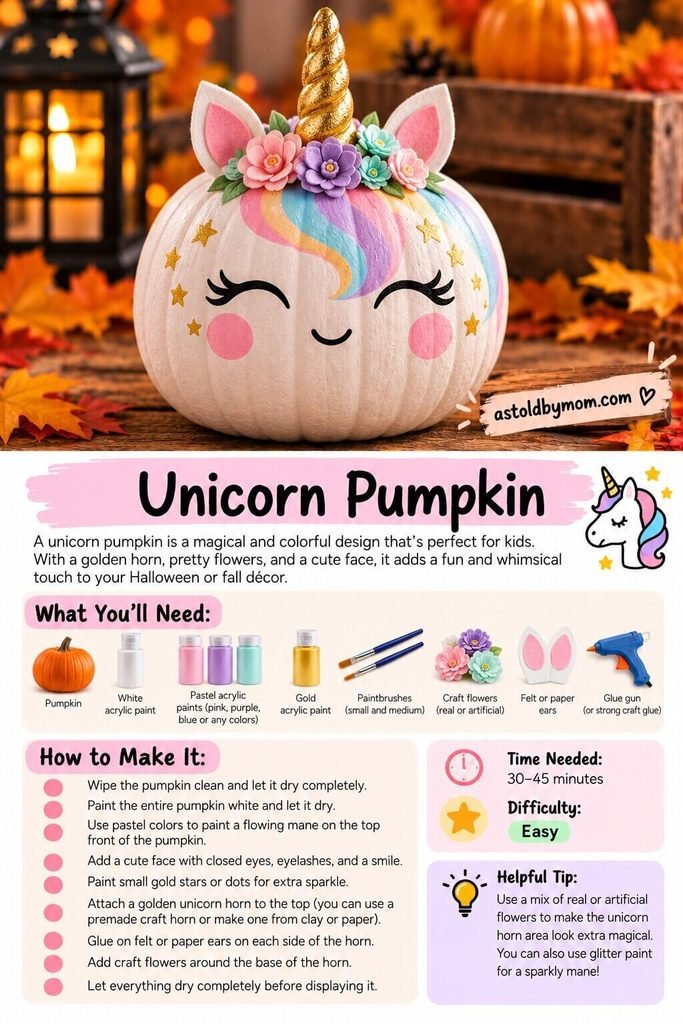
What You’ll Need
- Pumpkin
- White acrylic paint
- Pastel pink, purple, blue, or mint acrylic paint
- Black acrylic paint
- Gold acrylic paint
- Paintbrushes
- Golden unicorn horn
- Felt or craft foam for ears
- Craft flowers
- Craft glue
- Pencil
How to Make It
- Clean and dry the pumpkin.
- Paint the pumpkin white.
- Add a pastel rainbow mane near the top.
- Paint closed eyes with long eyelashes.
- Add rosy pink cheeks and a small smile.
- Paint small gold stars if desired.
- Attach the unicorn horn at the top.
- Add two felt ears.
- Glue flowers around the base of the horn.
Time Needed: 30 to 45 minutes
Difficulty: Easy
Helpful Tip: A premade craft horn makes this project much quicker.
6. Spiderweb Pumpkin
Paint dramatic black webs across a white pumpkin and add a few friendly little spiders for a classic Halloween design.
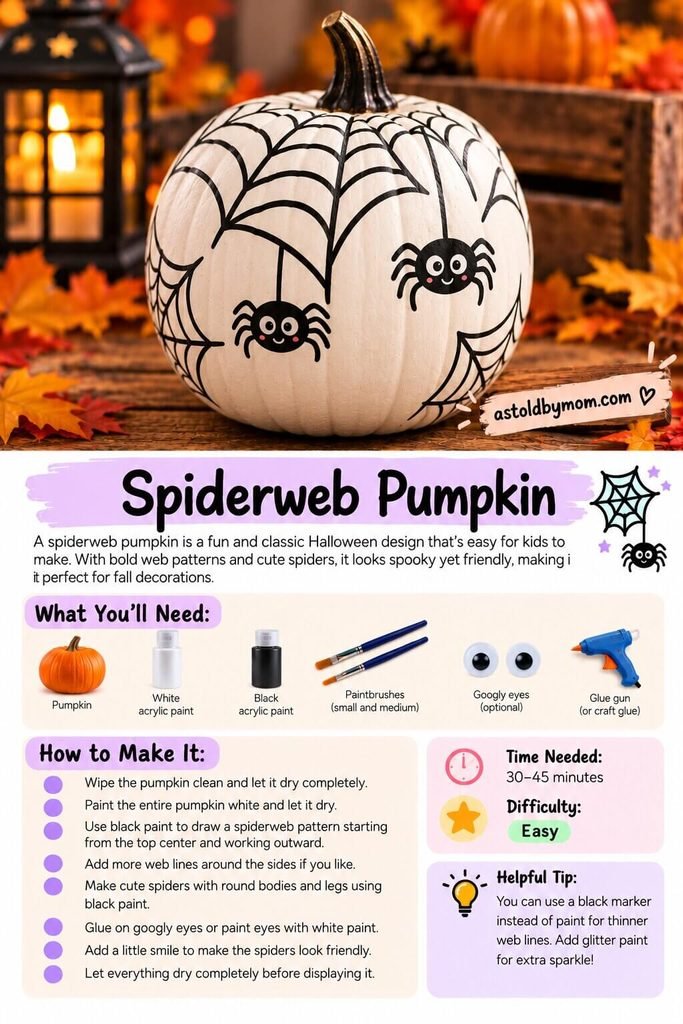
What You’ll Need
- Pumpkin
- White acrylic paint
- Black acrylic paint
- Small and medium paintbrushes
- Googly eyes, optional
- Craft glue
- Pencil or black paint marker
How to Make It
- Clean and dry the pumpkin.
- Paint the pumpkin white if needed.
- Sketch a few spiderweb patterns.
- Paint over the web lines using black paint.
- Paint small black spiders hanging from the webs.
- Add tiny googly eyes or painted eyes.
- Let the pumpkin dry completely.
Time Needed: 30 to 45 minutes
Difficulty: Easy
Helpful Tip: A black paint marker is great for drawing thin web lines.
7. Bat Pumpkin
Cover an orange pumpkin with flying black bats in different shapes and sizes for an easy spooky-night effect.
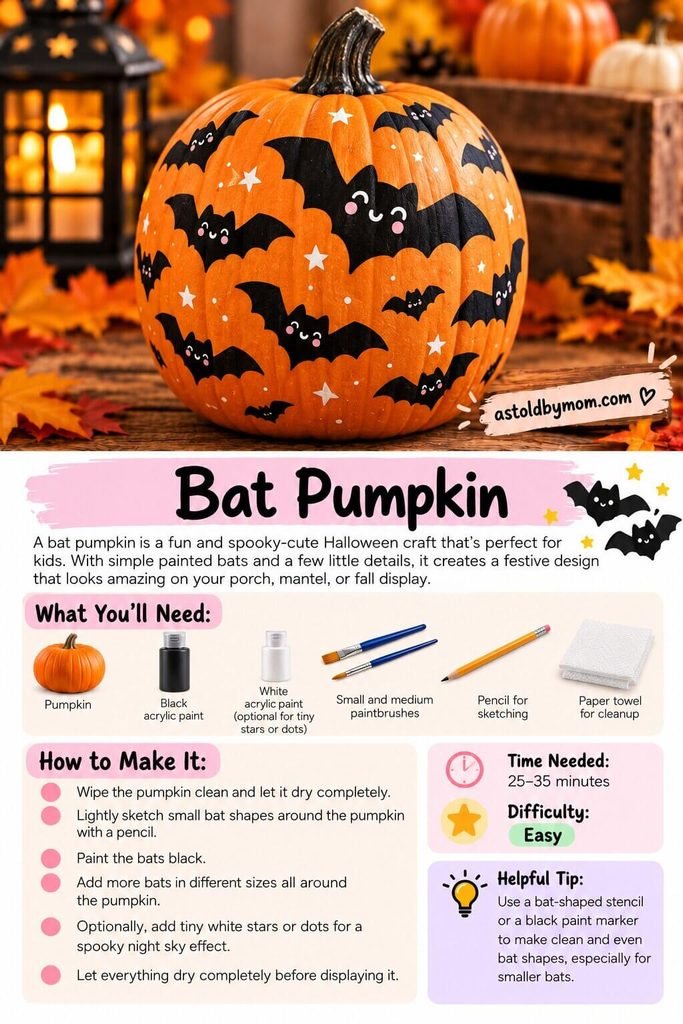
What You’ll Need
- Pumpkin
- Black acrylic paint
- White acrylic paint
- Small and medium paintbrushes
- Pencil
- Paper towel
How to Make It
- Clean and dry the pumpkin.
- Lightly sketch small bat silhouettes around the surface.
- Fill the bat shapes with black paint.
- Add larger and smaller bats for variety.
- Paint tiny white stars and dots between the bats if desired.
- Let everything dry.
Time Needed: 25 to 35 minutes
Difficulty: Easy
Helpful Tip: Use a bat stencil if freehand painting feels difficult.
8. Haunted House Pumpkin
This painted pumpkin creates an entire little Halloween scene with a dark sky, glowing moon, haunted house, bats, and bare trees.
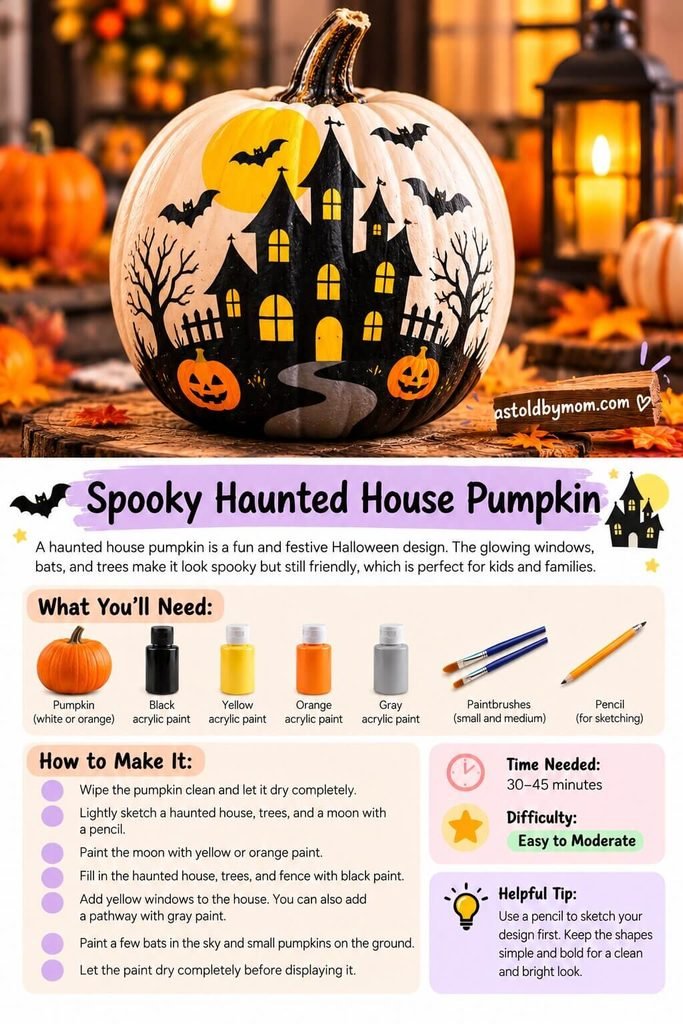
What You’ll Need
- Pumpkin
- Dark navy or black acrylic paint
- Black acrylic paint
- Yellow acrylic paint
- White acrylic paint
- Paintbrushes
- Pencil
- Paper towel
How to Make It
- Clean and dry the pumpkin.
- Paint the pumpkin dark navy or black.
- Sketch a large moon and haunted house silhouette.
- Paint the moon yellow.
- Paint the haunted house, trees, bats, and fence black.
- Add little yellow windows to the house.
- Add white stars if desired.
Time Needed: 30 to 45 minutes
Difficulty: Easy to Moderate
Helpful Tip: Keep the haunted house silhouette simple. Large shapes are much easier to paint.
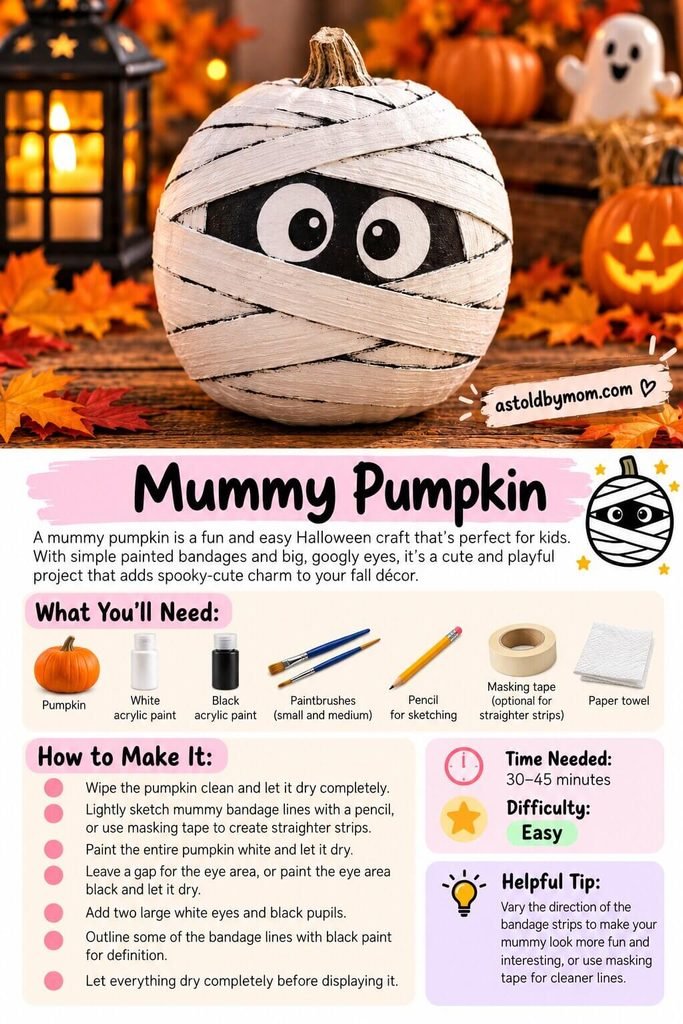
9. Mummy Pumpkin
Paint overlapping white bandage strips and leave a little opening for two cartoon eyes to peek through.
What You’ll Need
- Pumpkin
- White acrylic paint
- Black acrylic paint
- Paintbrushes
- Pencil
- Masking tape, optional
- Paper towel
How to Make It
- Clean and dry the pumpkin.
- Paint the pumpkin white.
- Sketch diagonal bandage strips around the pumpkin.
- Leave an open area for the eyes.
- Paint that area black.
- Add two large white eyes with black pupils.
- Outline some bandages with thin black lines.
Time Needed: 30 to 45 minutes
Difficulty: Easy
Helpful Tip: Change the direction of the bandages to make the mummy look more playful.
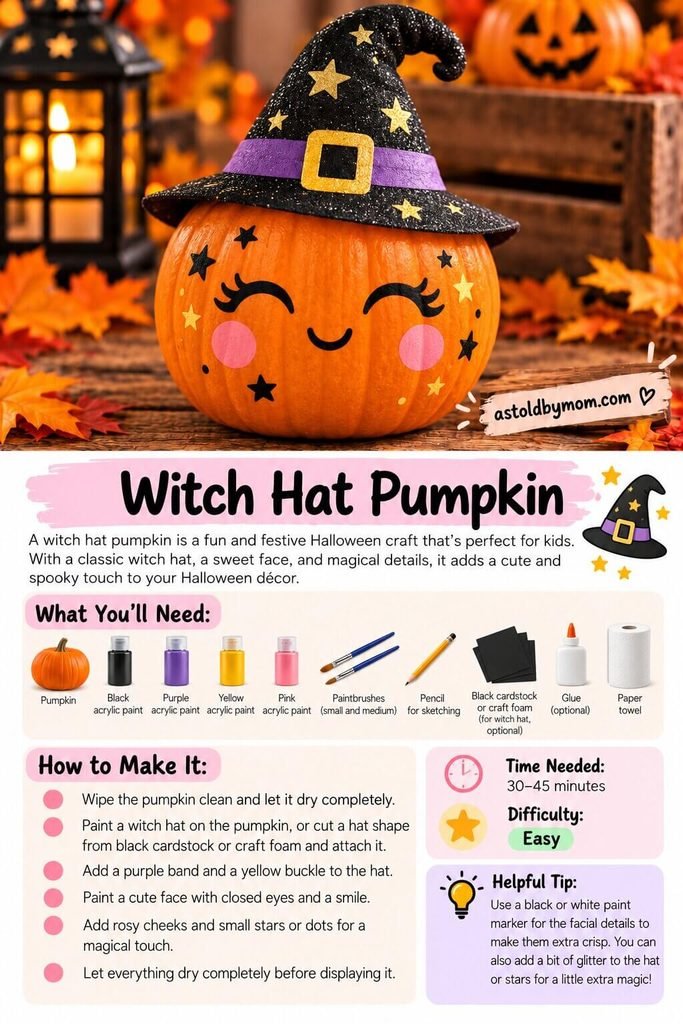
10. Witch Hat Pumpkin
Give your pumpkin a sweet little witch personality with a black hat, purple band, stars, and rosy cheeks.
What You’ll Need
- Pumpkin
- Black acrylic paint
- Purple acrylic paint
- Yellow or gold acrylic paint
- Pink acrylic paint
- Paintbrushes
- Pencil
- Black cardstock or craft foam
- Craft glue
- Paper towel
How to Make It
- Clean and dry the pumpkin.
- Paint or create a black witch hat.
- Add a purple band.
- Paint a gold or yellow buckle.
- Decorate the hat with stars.
- Paint closed eyes and a smile on the pumpkin.
- Add pink cheeks and tiny decorative stars.
Time Needed: 30 to 45 minutes
Difficulty: Easy
Helpful Tip: A separate craft-foam witch hat gives the pumpkin a fun three-dimensional look.
11. Polka Dot Pumpkin
This may be one of the easiest pumpkin painting ideas in the entire collection. Simply cover your pumpkin with colorful dots.

What You’ll Need
- Pumpkin
- Orange acrylic paint, optional
- Black acrylic paint
- Purple acrylic paint
- White acrylic paint
- Paintbrushes
- Pencil
- Dotting tool, optional
How to Make It
- Clean and dry the pumpkin.
- Paint the base orange if needed.
- Add large and small dots in black, purple, orange, and white.
- Space them randomly around the pumpkin.
- Fill empty areas with smaller dots.
- Let everything dry.
Time Needed: 20 to 30 minutes
Difficulty: Easy
Helpful Tip: The rounded end of a paintbrush can work as a simple dotting tool.
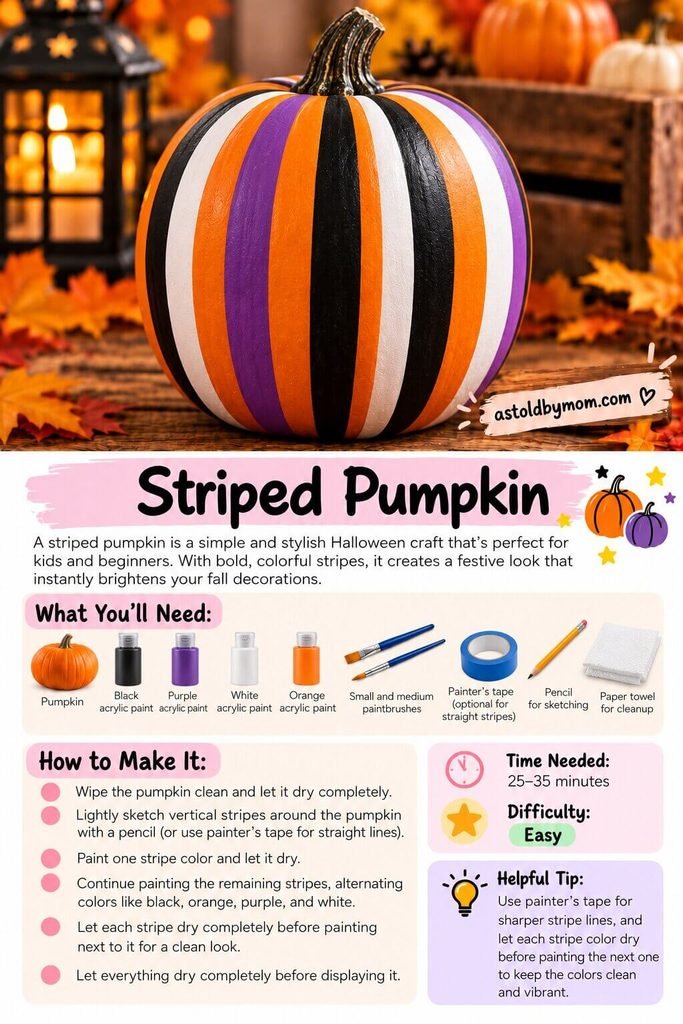
12. Striped Pumpkin
Bold vertical stripes make a regular pumpkin look instantly polished while still keeping the project beginner-friendly.
What You’ll Need
- Pumpkin
- Black acrylic paint
- Purple acrylic paint
- Orange acrylic paint
- White acrylic paint
- Paintbrushes
- Painter’s tape
- Pencil
- Paper towel
How to Make It
- Clean and dry the pumpkin.
- Sketch vertical stripe sections using the pumpkin’s natural grooves.
- Use painter’s tape if you want extra-clean edges.
- Paint alternating stripes in your chosen colors.
- Allow one section to dry before painting beside it.
- Remove the tape once everything is dry.
Time Needed: 25 to 35 minutes
Difficulty: Easy
Helpful Tip: The natural ridges of the pumpkin make convenient stripe guides.
13. Drip Paint Pumpkin
This colorful pumpkin looks impressive even though the technique is wonderfully simple.

What You’ll Need
- Pumpkin
- Black acrylic paint
- Orange acrylic paint
- Purple acrylic paint
- White acrylic paint
- Pink acrylic paint
- Paintbrushes
- Spoon or drip tool
- Paper plate
- Paper towels
How to Make It
- Clean and dry your pumpkin.
- Protect your work surface.
- Pour small amounts of paint onto a plate.
- Use a spoon or brush to drip paint around the top.
- Allow the paint to naturally run down the sides.
- Layer additional colors.
- Let everything dry completely.
Time Needed: 20 to 30 minutes
Difficulty: Easy
Helpful Tip: Start with less paint. You can always add longer drips later.
14. Heart Pattern Pumpkin
Tiny painted hearts give this pumpkin a sweet and playful look that works especially well with pink, purple, black, and white.

What You’ll Need
- Pumpkin
- Pink acrylic paint
- Purple acrylic paint
- White acrylic paint
- Black acrylic paint
- Small paintbrush
- Medium paintbrush
- Pencil
- Paper towel
How to Make It
- Clean and dry the pumpkin.
- Lightly sketch a few guide rows.
- Paint hearts around the pumpkin.
- Alternate the colors.
- Change the heart sizes for variety.
- Add tiny white dots between some of the hearts.
- Let the paint dry.
Time Needed: 20 to 30 minutes
Difficulty: Easy
Helpful Tip: A repeating but imperfect pattern makes the finished pumpkin feel handmade and playful.
15. Smiley Face Pumpkin
Sometimes simple is best. A giant cheerful face creates an adorable pumpkin that younger children can easily help paint.

What You’ll Need
- Pumpkin
- Black acrylic paint
- Pink acrylic paint
- White acrylic paint
- Paintbrushes
- Pencil
- Paper towel
How to Make It
- Clean and dry the pumpkin.
- Sketch two large oval eyes.
- Draw a big curved smile.
- Paint the eyes and smile black.
- Add white highlights inside the eyes.
- Paint two pink cheeks.
- Let everything dry.
Time Needed: 15 to 25 minutes
Difficulty: Easy
Helpful Tip: Trace around a small cup to create evenly sized eyes.
16. Floral Pumpkin
Flowers, leaves, and curling vines turn a pumpkin into a pretty fall centerpiece that can stay on display beyond Halloween.

What You’ll Need
- Pumpkin
- White or light pink acrylic paint
- Green acrylic paint
- Pink acrylic paint
- Orange acrylic paint
- Yellow acrylic paint
- White acrylic paint
- Black acrylic paint, optional
- Paintbrushes
- Pencil
How to Make It
- Clean and dry the pumpkin.
- Paint a light base color if desired.
- Lightly sketch flowers, leaves, and vines.
- Paint the largest flowers first.
- Add leaves and curling vines.
- Fill gaps with smaller flowers and berries.
- Let everything dry.
Time Needed: 30 to 45 minutes
Difficulty: Easy to Moderate
Helpful Tip: Start with your biggest flowers and fill empty spaces afterward.
17. Pink Pumpkin
A soft pink pumpkin decorated with little bows, flowers, hearts, or gold accents gives Halloween decor a cute modern twist.

What You’ll Need
- Pumpkin
- Pink acrylic paint
- Darker pink acrylic paint
- White acrylic paint
- Gold acrylic paint
- Black acrylic paint, optional
- Paintbrushes
- Pencil
- Paper towel
How to Make It
- Clean and dry the pumpkin.
- Paint the whole pumpkin pink.
- Let it dry.
- Add bows or hearts using a darker pink.
- Add tiny white flowers or dots.
- Finish with small gold details if desired.
Time Needed: 20 to 30 minutes
Difficulty: Easy
Helpful Tip: Using two shades of pink adds more dimension without making the design complicated.
18. Black and White Pumpkin
Checks, stripes, stars, and dots create a stylish monochrome pumpkin that works beautifully with modern Halloween decor.

What You’ll Need
- Pumpkin
- Black acrylic paint
- White acrylic paint
- Paintbrushes
- Painter’s tape
- Pencil
- Paper towel
How to Make It
- Clean and dry the pumpkin.
- Sketch your basic pattern.
- Tape off any sections that need clean edges.
- Paint alternating black and white sections.
- Add stars, dots, or checks.
- Remove the tape carefully.
- Let the pumpkin dry.
Time Needed: 25 to 35 minutes
Difficulty: Easy to Moderate
Helpful Tip: Combine one bold pattern with one smaller accent pattern so the design does not become too busy.
19. Gold Glam Pumpkin
Metallic gold paint gives a simple pumpkin an elegant makeover perfect for fall tables, mantels, or Halloween displays.

What You’ll Need
- Pumpkin
- Gold acrylic paint
- White or black acrylic paint
- Small and medium paintbrushes
- Sponge or splatter brush
- Pencil
- Paper towel
How to Make It
- Clean and dry the pumpkin.
- Paint the pumpkin white or black if you want a dramatic base.
- Sketch your design.
- Paint gold stars, leaves, vines, dots, or geometric details.
- Add gold splatters for texture.
- Paint the stem gold if desired.
- Let everything dry.
Time Needed: 25 to 35 minutes
Difficulty: Easy
Helpful Tip: Gold looks best when used as an accent rather than covering every inch of the pumpkin.
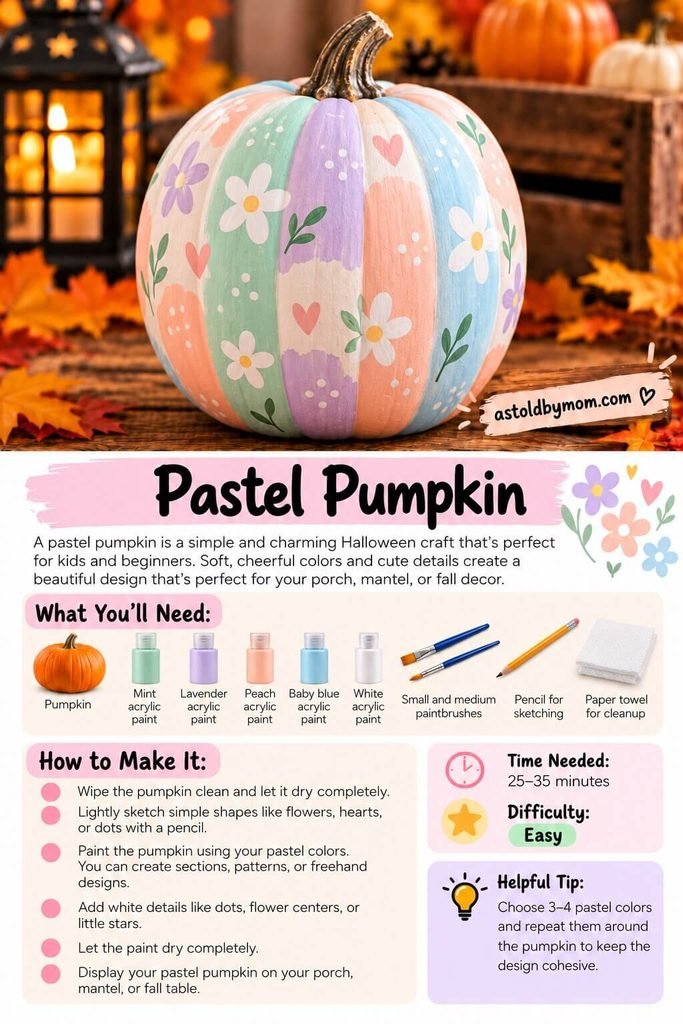
20. Pastel Pumpkin
Mint, lavender, peach, baby blue, and soft pink create a dreamy alternative to traditional Halloween colors.
What You’ll Need
- Pumpkin
- Mint acrylic paint
- Lavender acrylic paint
- Peach acrylic paint
- Baby blue acrylic paint
- White acrylic paint
- Small and medium paintbrushes
- Pencil
- Paper towel
How to Make It
- Clean and dry the pumpkin.
- Sketch simple sections or patterns.
- Paint different sections with pastel colors.
- Add simple white flowers, hearts, or dots.
- Paint small green leaves if desired.
- Let everything dry.
Time Needed: 25 to 35 minutes
Difficulty: Easy
Helpful Tip: Stick with three or four pastel shades for a more cohesive finished design.
21. Emoji Pumpkin
This happy pumpkin is covered in familiar expressions such as heart eyes, laughing faces, winks, and cheerful smiles.
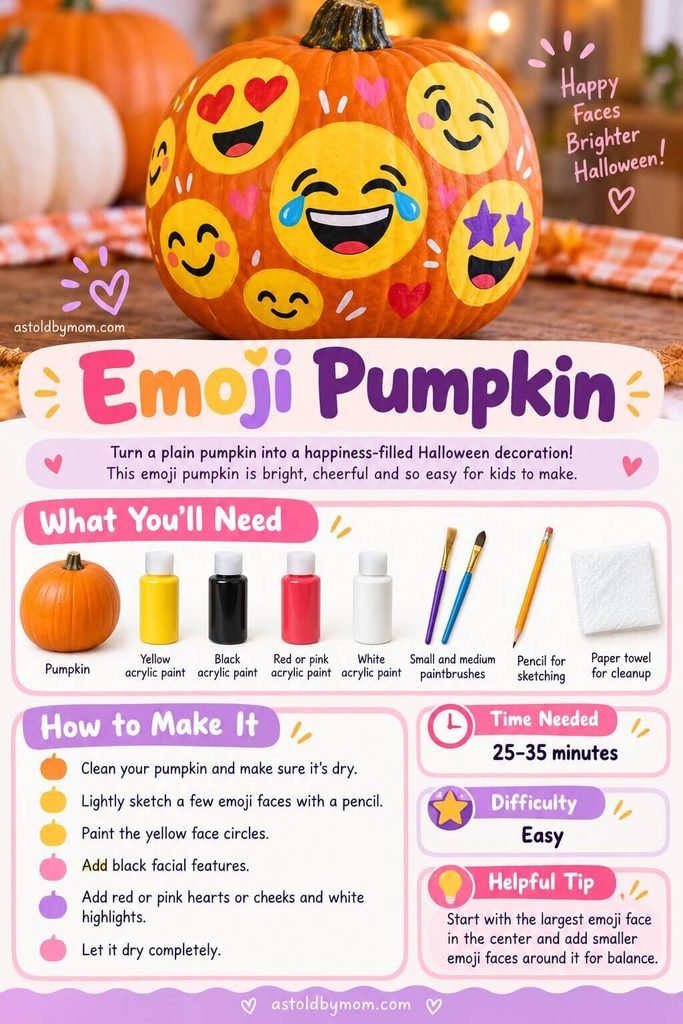
What You’ll Need
- Pumpkin
- Yellow acrylic paint
- Black acrylic paint
- Red or pink acrylic paint
- White acrylic paint
- Small and medium paintbrushes
- Pencil
- Paper towel
How to Make It
- Clean and dry the pumpkin.
- Sketch several circles around the surface.
- Paint each circle yellow.
- Add different emoji expressions using black paint.
- Paint hearts, cheeks, or tongues in pink and red.
- Add white eye highlights where needed.
- Let everything dry.
Time Needed: 25 to 35 minutes
Difficulty: Easy
Helpful Tip: Make one large emoji the focal point and surround it with smaller expressions.
22. Galaxy Pumpkin
Deep blue, purple, pink, and white paint combine to create a dreamy night-sky pumpkin filled with stars and moons.
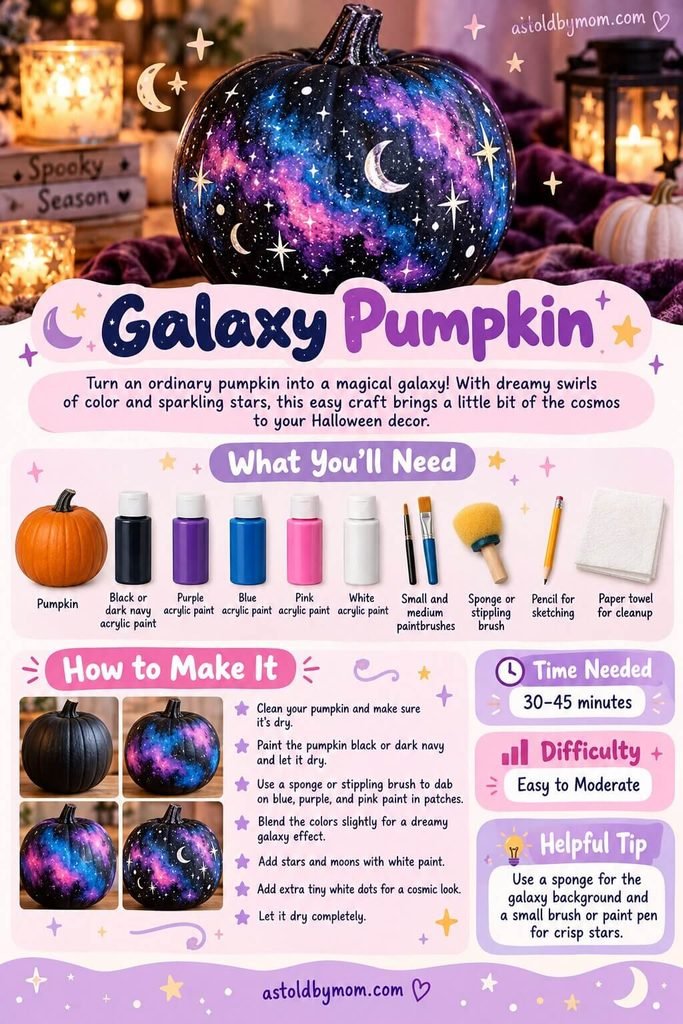
What You’ll Need
- Pumpkin
- Black or dark navy acrylic paint
- Purple acrylic paint
- Blue acrylic paint
- Pink acrylic paint
- White acrylic paint
- Paintbrushes
- Sponge
- Pencil
- Paper towel
How to Make It
- Clean and dry the pumpkin.
- Paint the pumpkin black or dark navy.
- Let the base coat dry.
- Dab blue, purple, and pink paint onto the surface using a sponge.
- Blend the edges slightly.
- Add white stars and tiny dots.
- Paint crescent moons or larger stars.
- Let everything dry.
Time Needed: 30 to 45 minutes
Difficulty: Easy to Moderate
Helpful Tip: Use a sponge rather than a brush for the colorful galaxy clouds.
23. Rainbow Pumpkin
Bright rainbow stripes are a cheerful alternative to traditional orange-and-black Halloween decorations.
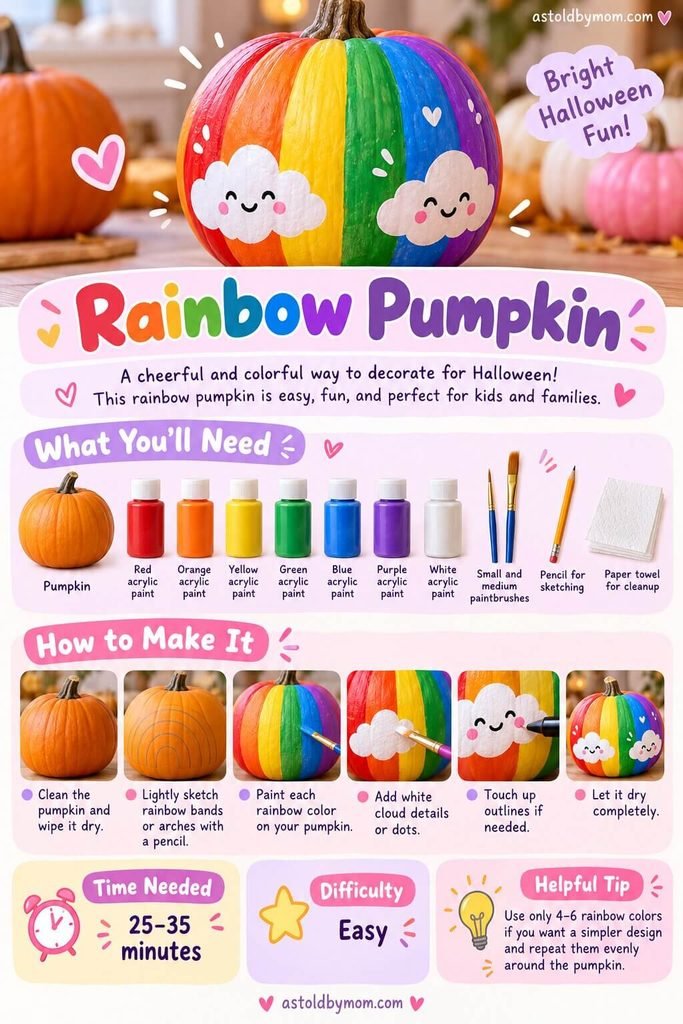
What You’ll Need
- Pumpkin
- Red acrylic paint
- Orange acrylic paint
- Yellow acrylic paint
- Green acrylic paint
- Blue acrylic paint
- Purple acrylic paint
- White acrylic paint
- Paintbrushes
- Pencil
- Paper towel
How to Make It
- Clean and dry the pumpkin.
- Sketch rainbow sections around the pumpkin.
- Paint each section a different rainbow color.
- Let the colors dry.
- Add white clouds if desired.
- Paint little faces, hearts, or dots on the clouds.
- Touch up any uneven areas.
Time Needed: 25 to 35 minutes
Difficulty: Easy
Helpful Tip: Use the natural grooves of the pumpkin as guides for the rainbow sections.
24. Skeleton Pumpkin
A black pumpkin with white bones creates a bold Halloween look while still keeping the design cute enough for family decorating.

What You’ll Need
- Pumpkin
- Black acrylic paint
- White acrylic paint
- Small and medium paintbrushes
- Pencil
- Paper towel
How to Make It
- Clean and dry the pumpkin.
- Paint the entire pumpkin black.
- Let it dry completely.
- Sketch a skull face in the center.
- Add simple rib and bone shapes around it.
- Fill everything with white paint.
- Touch up the black background if needed.
Time Needed: 25 to 35 minutes
Difficulty: Easy
Helpful Tip: Keep the bones bold and cartoon-like instead of trying to make them anatomically detailed.
25. Frankenstein Pumpkin
Finish the collection with a classic green Frankenstein pumpkin complete with black hair, stitched details, and gray bolts.

What You’ll Need
- Pumpkin
- Green acrylic paint
- Black acrylic paint
- White acrylic paint
- Gray acrylic paint
- Small and medium paintbrushes
- Pencil
- Paper towel
How to Make It
- Clean and dry the pumpkin.
- Paint the entire pumpkin bright green.
- Let the paint dry.
- Sketch a jagged hairline, eyes, mouth, eyebrows, and stitches.
- Paint the hair and facial features black.
- Add large white eyes with black pupils.
- Paint little gray bolts on the sides.
- Add stitched details across the forehead or cheek.
Time Needed: 25 to 35 minutes
Difficulty: Easy
Helpful Tip: Exaggerated eyebrows and uneven stitches make Frankenstein look even more fun.
Tips for Better Painted Pumpkins
A few little tricks can make pumpkin painting much easier:
- Choose pumpkins with fairly smooth surfaces when possible.
- Wash away dirt and let pumpkins dry completely before painting.
- Apply thin coats of paint instead of one very thick layer.
- Let each color dry before painting directly beside it.
- Sketch complicated designs lightly with a pencil first.
- Use paint markers for small details.
- Use painter’s tape for stripes and geometric patterns.
- Place paper towels or newspaper underneath your pumpkin while painting.
- If children are helping, give them washable craft aprons or old shirts.
Real Pumpkins vs. Artificial Pumpkins
You can use either one for most of these projects.
Real pumpkins are inexpensive and give your decorations a natural seasonal look. Artificial pumpkins are a good choice when you want to save your creation and use it again next Halloween.
Foam craft pumpkins are also lighter, which can make them easier for children to decorate.
Can Kids Paint Pumpkins?
Absolutely. Pumpkin painting is one of my favorite alternatives to carving when younger children want to participate in Halloween decorating.
Stick with simple projects such as the Smiley Face Pumpkin, Polka Dot Pumpkin, Candy Corn Pumpkin, Rainbow Pumpkin, Bat Pumpkin, or Googly Monster Pumpkin for younger kids.
Adults should handle hot glue, sharp scissors, or any other tools that are not appropriate for the child’s age.
Which Pumpkin Painting Idea Should You Try?
If you love traditional Halloween, start with the Bat Pumpkin, Spiderweb Pumpkin, Mummy Pumpkin, Haunted House Pumpkin, Frankenstein Pumpkin, or Skeleton Pumpkin.
For something cute, try the Ghost Pumpkin, Unicorn Pumpkin, Emoji Pumpkin, Pink Pumpkin, or Smiley Face Pumpkin.
And if you prefer something more decorative, the Floral Pumpkin, Gold Glam Pumpkin, Black and White Pumpkin, Galaxy Pumpkin, or Pastel Pumpkin would look beautiful in a fall display.
Final Thoughts
There are so many creative ways to decorate a pumpkin without ever picking up a carving knife. A few bottles of paint can turn an ordinary pumpkin into a ghost, unicorn, monster, galaxy, rainbow, haunted house, or just about anything else you can imagine.
The best part is that these projects do not need to look perfect. Hand-painted details are part of what makes each pumpkin unique.
Pick a few favorites, spread out the paint, and turn an ordinary fall afternoon into a fun Halloween craft session.
And if you still enjoy traditional jack-o’-lanterns, be sure to check out our pumpkin carving ideas for even more Halloween inspiration.


