
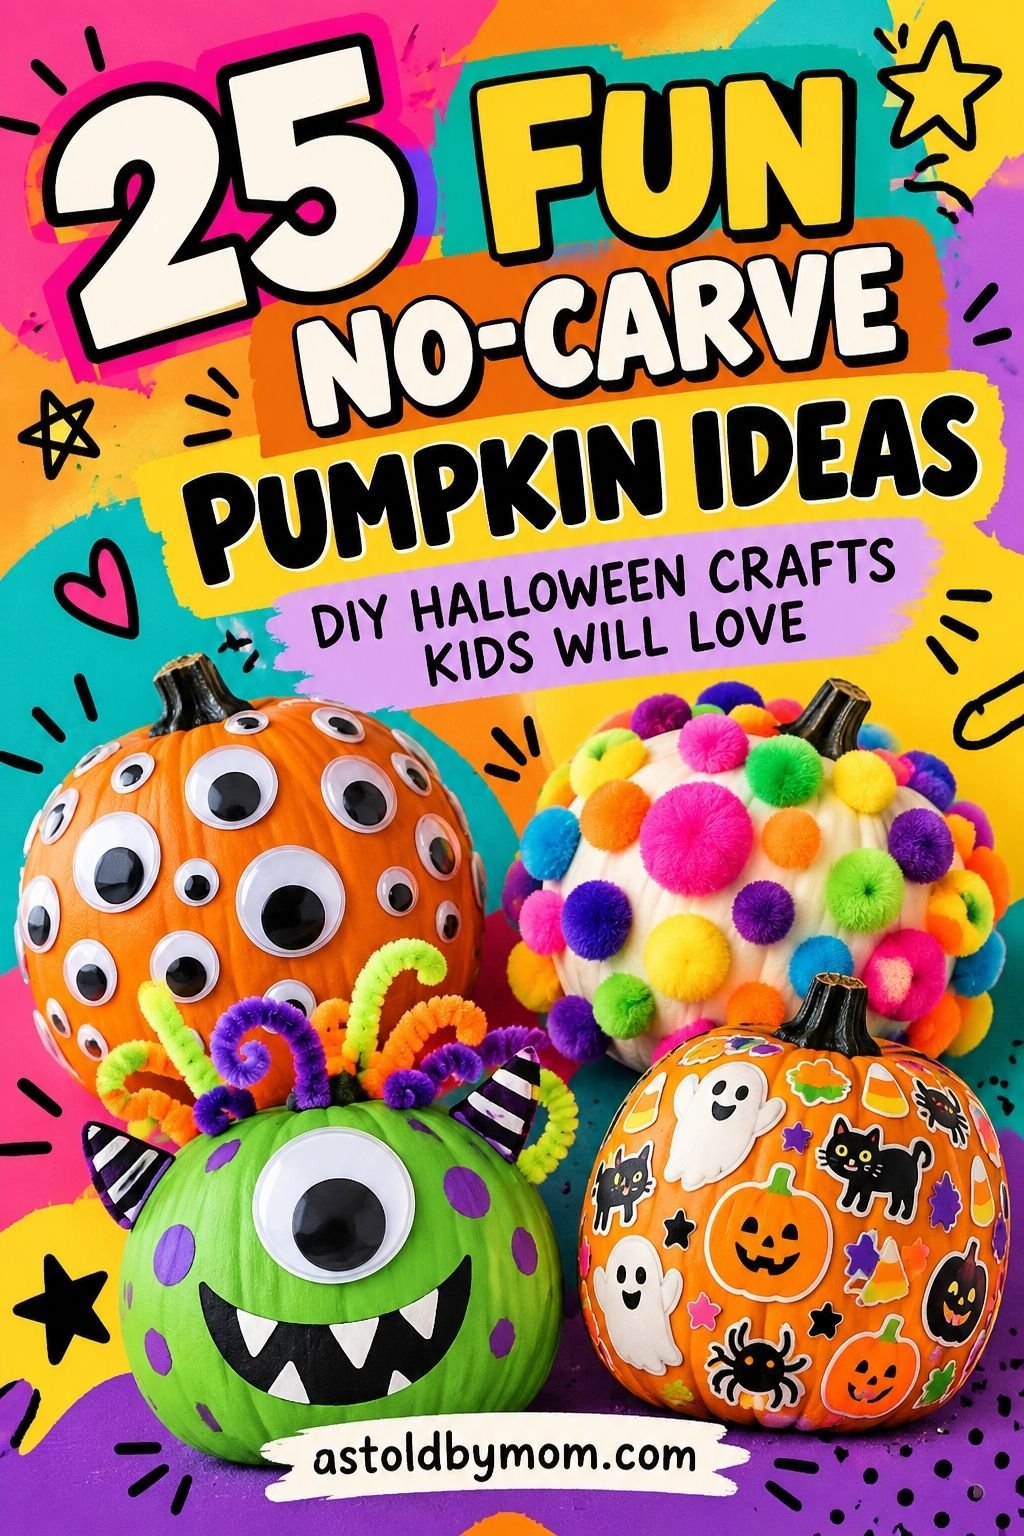
Pumpkin carving is a Halloween classic, but it is definitely not the only way to decorate pumpkins.
If you would rather skip the carving tools, pumpkin guts, and cleanup, these no-carve pumpkin decorating ideas give you plenty of other ways to get creative. Instead of cutting into the pumpkin, we are using things like ribbon, glitter, fabric, yarn, buttons, felt, flowers, pearls, stickers, and other easy craft supplies.
Some of these ideas are cute enough for kids, while others are stylish enough to use as part of your fall porch, mantel, entryway, or Halloween party decor.
The best part is that you do not need to be an experienced crafter. Most of these projects are beginner-friendly and can be completed with basic supplies you may already have at home.
Why Decorate Pumpkins Without Carving?
No-carve pumpkins are especially useful when you want your decorations to last longer.
Because you are not cutting into the pumpkin, there is less exposed flesh to dry out or spoil. They are also easier to make with younger children because there are fewer sharp tools involved.
And creatively, you have almost endless possibilities.
You can make a pumpkin sparkly, soft, elegant, silly, colorful, spooky, floral, vintage-inspired, or completely unexpected.
Basic Supplies You May Need
You will not need every item below for every project, but these are useful supplies to have nearby:
- Pumpkins
- Craft glue
- Hot glue gun
- Scissors
- Ribbon
- Fabric
- Yarn
- Felt
- Craft foam
- Decorative tape
- Buttons
- Faux pearls
- Rhinestones
- Artificial flowers
- Feathers
- Googly eyes
- Stickers
- Paper towels
- Small bowls or trays
- Paintbrushes or foam brushes
Now let us start decorating.
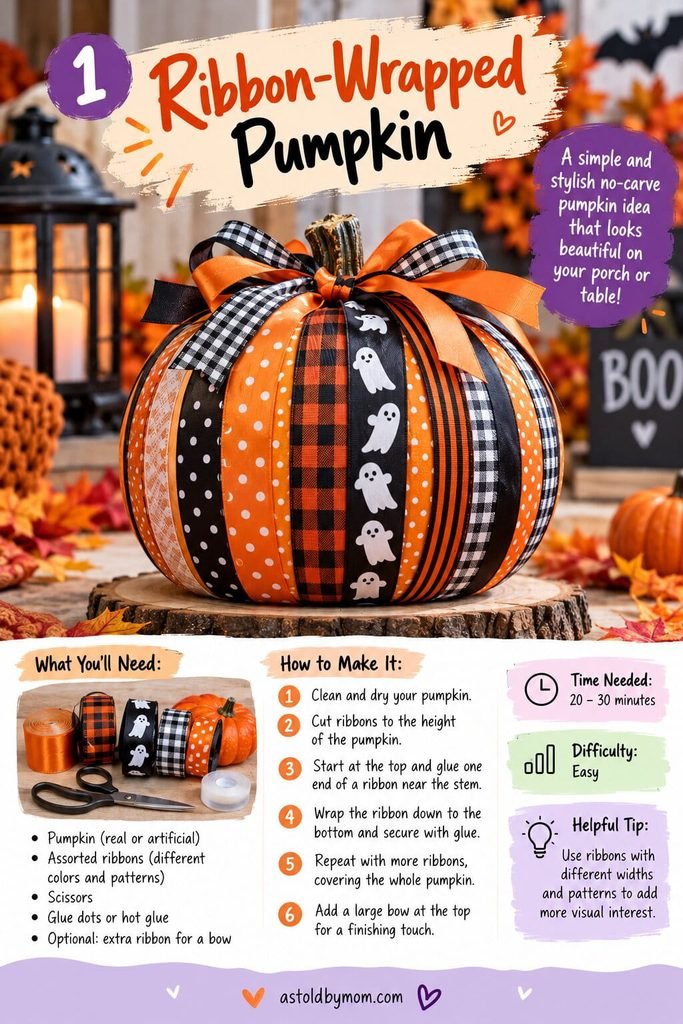
1. Ribbon-Wrapped Pumpkin
Ribbon is one of the easiest ways to completely change the look of a pumpkin without carving or painting it.
Mix orange, black, white, gingham, polka dot, burlap, or Halloween-print ribbons for a layered design.
What You’ll Need
- Pumpkin
- Several ribbons in different widths and patterns
- Craft glue or hot glue
- Scissors
- Large ribbon for a bow
- Paper towel
How to Make It
- Clean the pumpkin and let it dry completely.
- Cut several lengths of ribbon long enough to run from the stem to the bottom.
- Glue one end near the stem.
- Smooth the ribbon down the side of the pumpkin.
- Secure the other end underneath.
- Continue alternating ribbon patterns around the pumpkin.
- Finish with a large decorative bow near the stem.
Time Needed: 25–35 minutes
Difficulty: Easy
Helpful Tip: Mix narrow and wide ribbon so the finished design has more texture.
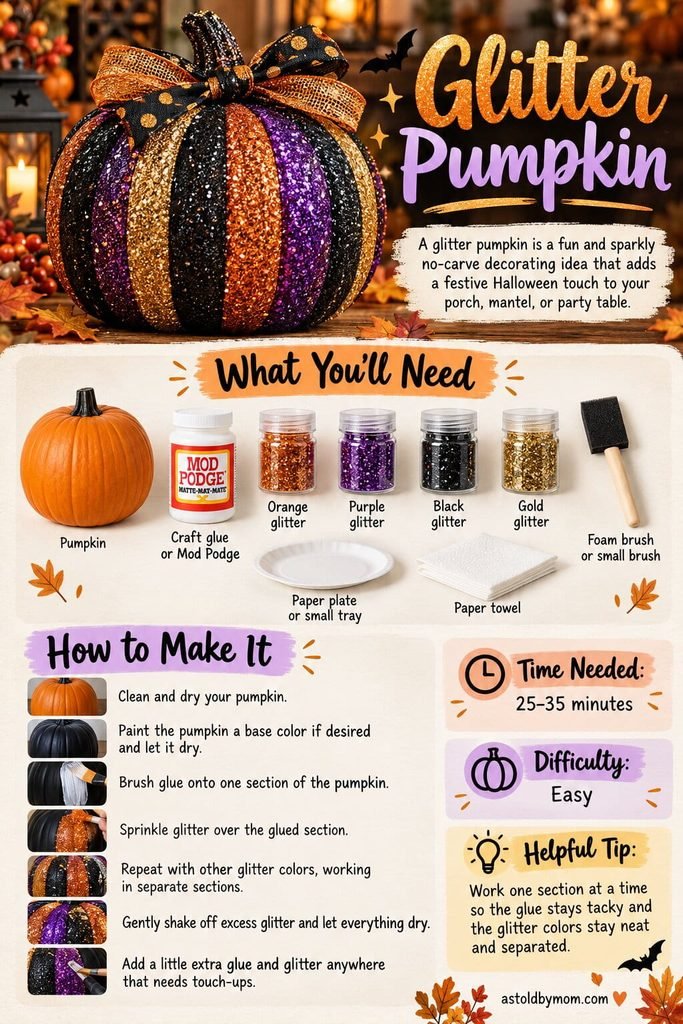
2. Glitter Pumpkin
If Halloween decorating needs a little sparkle, this is the pumpkin to make.
You can cover the whole pumpkin or glitter individual sections using orange, purple, black, and gold.
What You’ll Need
- Pumpkin
- Craft glue or decoupage glue
- Glitter in Halloween colors
- Foam brush
- Small plate or tray
- Paper towel
How to Make It
- Clean and dry your pumpkin.
- Paint the pumpkin first if you want a different base color.
- Brush glue onto one section.
- Sprinkle glitter generously over the glue.
- Gently shake away the excess.
- Repeat with additional colors around the pumpkin.
- Let everything dry completely.
Time Needed: 25–35 minutes
Difficulty: Easy
Helpful Tip: Work one section at a time so the glue remains tacky while you apply the glitter.
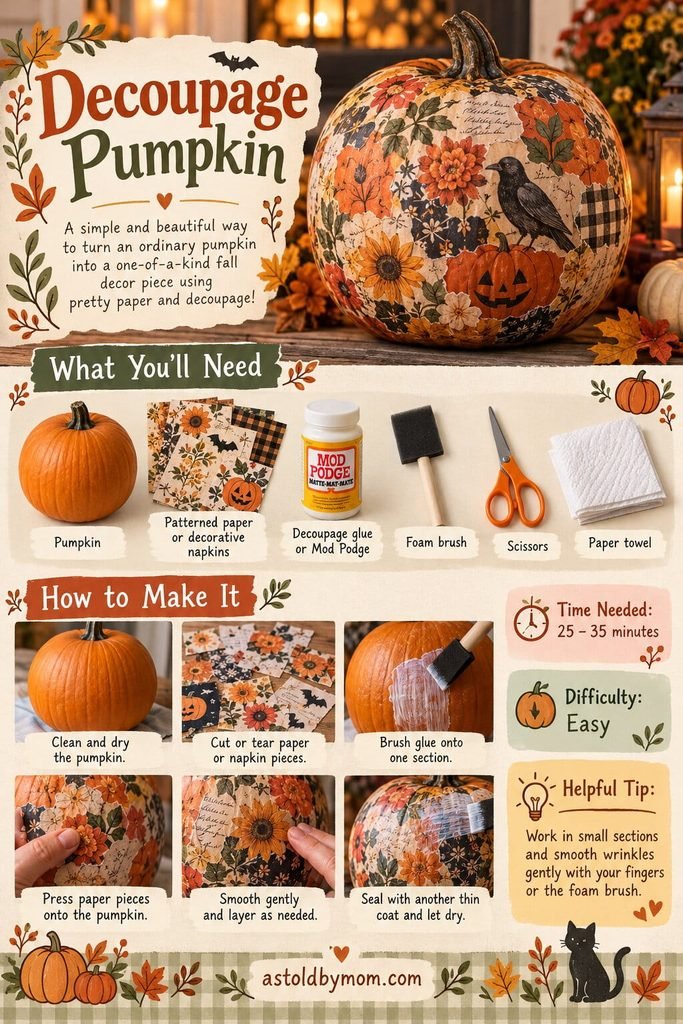
3. Decoupage Pumpkin
Patterned napkins or decorative paper can turn a plain pumpkin into something that looks much more detailed than it actually is.
Florals, fall leaves, vintage patterns, and Halloween prints all work beautifully.
What You’ll Need
- Pumpkin
- Decorative paper or patterned napkins
- Decoupage glue
- Foam brush
- Scissors
- Small bowl or tray
- Paper towel
How to Make It
- Clean and dry the pumpkin.
- Cut or tear your paper into manageable pieces.
- Brush a thin layer of decoupage glue onto one section.
- Place the paper over the glue.
- Smooth it carefully with your fingers or brush.
- Brush another thin layer of decoupage glue over the top.
- Continue until you are happy with the coverage.
- Let it dry completely.
Time Needed: 30–45 minutes
Difficulty: Easy
Helpful Tip: Thin napkins conform to pumpkin curves more easily than thick paper.
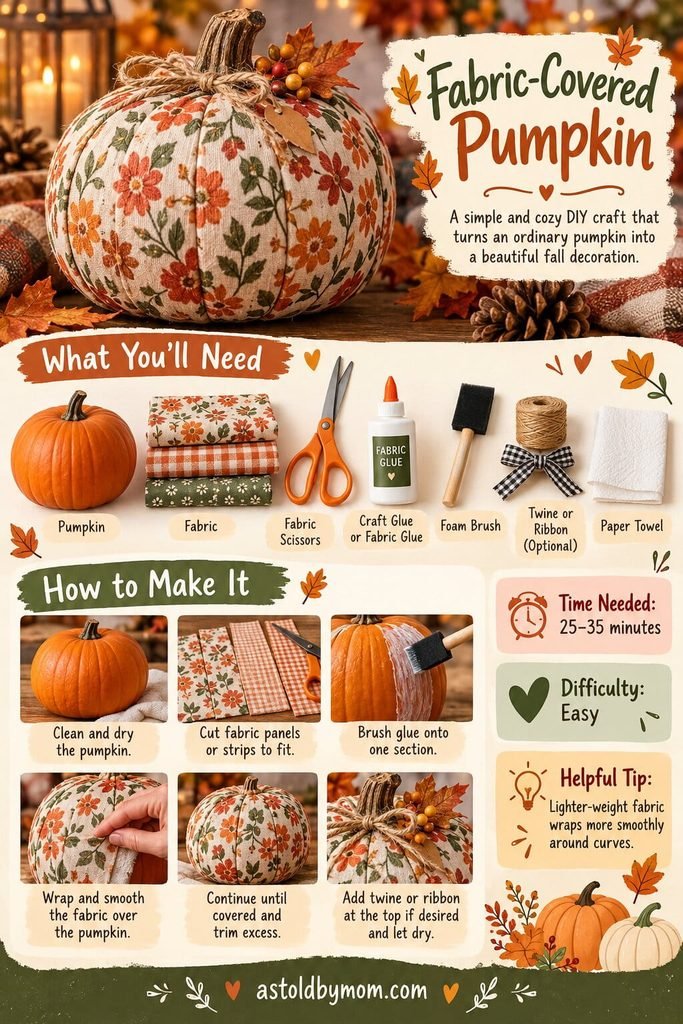
4. Fabric-Covered Pumpkin
Fabric gives pumpkins a warm, soft texture that works beautifully with cozy fall decor.
Try florals, gingham, plaid, or small autumn prints.
What You’ll Need
- Pumpkin
- Lightweight fabric
- Fabric scissors
- Craft glue or fabric glue
- Foam brush
- Twine or ribbon, optional
- Paper towel
How to Make It
- Clean and dry the pumpkin.
- Cut the fabric into strips or panels.
- Brush glue onto one pumpkin section.
- Lay the fabric over the glue.
- Smooth it around the pumpkin curve.
- Trim any excess fabric.
- Continue until the pumpkin is covered.
- Add twine or ribbon near the stem if desired.
Time Needed: 25–35 minutes
Difficulty: Easy
Helpful Tip: Lightweight fabric is easier to smooth around curved surfaces.
5. Yarn-Wrapped Pumpkin
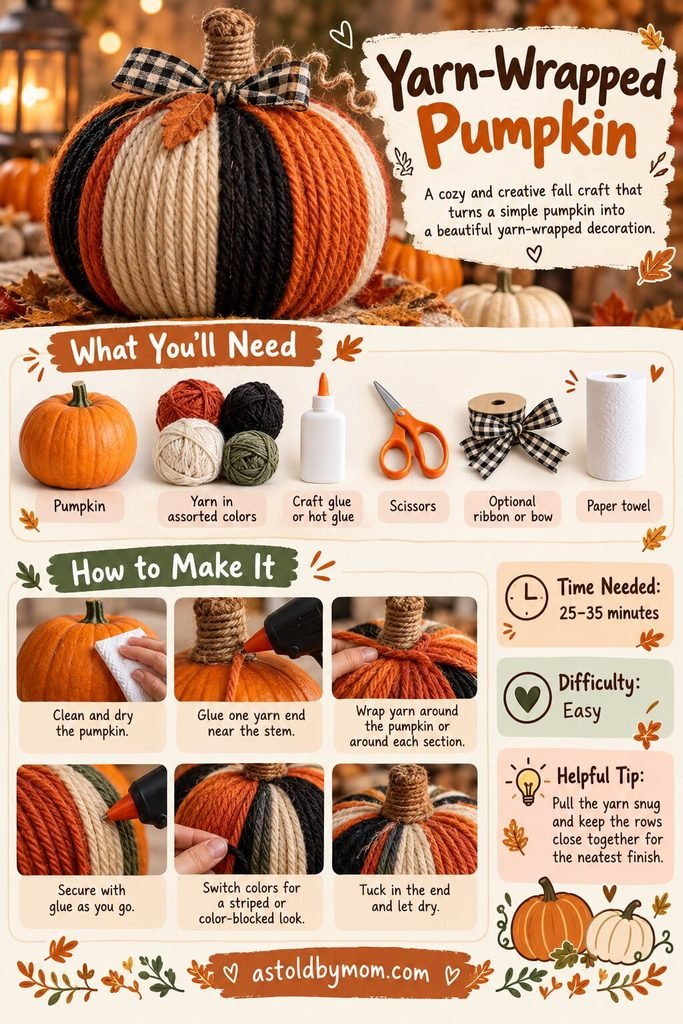
Yarn adds plenty of texture while keeping the project simple.
Use traditional Halloween colors or choose softer fall shades for a more neutral look.
What You’ll Need
- Pumpkin
- Yarn
- Craft glue or hot glue
- Scissors
- Paper towel
How to Make It
- Clean and dry the pumpkin.
- Secure one end of the yarn near the stem.
- Run the yarn vertically down the side.
- Secure it underneath.
- Continue wrapping strands around the pumpkin.
- Alternate colors if desired.
- Glue the loose ends securely.
Time Needed: 25–35 minutes
Difficulty: Easy
Helpful Tip: Thick yarn covers more surface area and makes the project quicker.
6. Pom-Pom Pumpkin
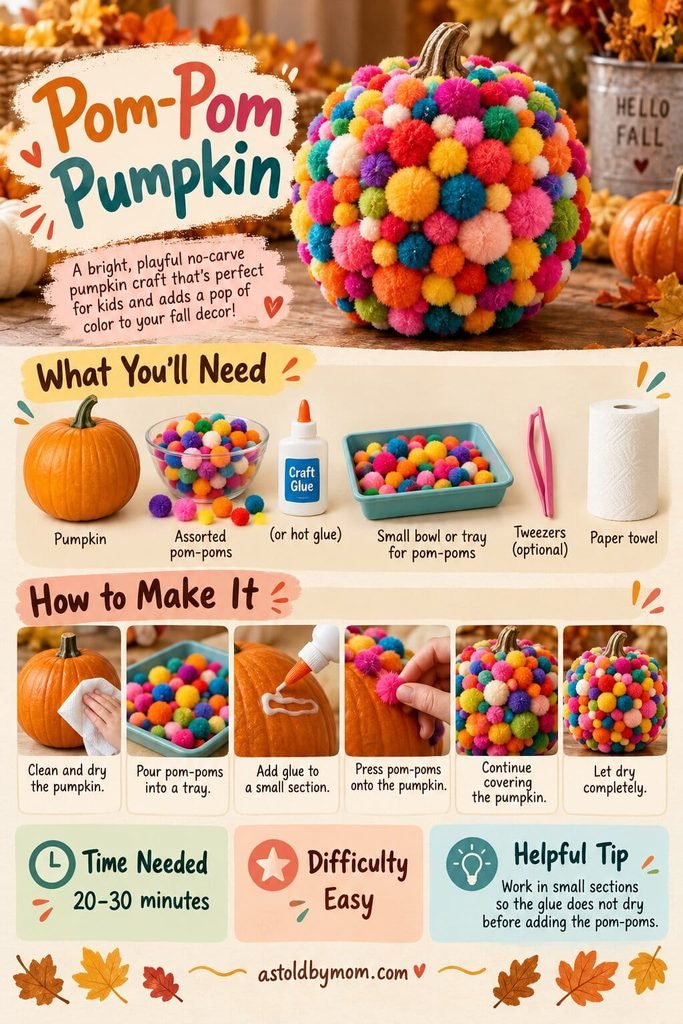
Bright little pom-poms instantly make an ordinary pumpkin look playful.
This is also an easy project for children because there is no need for precise placement.
What You’ll Need
- Pumpkin
- Pom-poms in assorted colors and sizes
- Craft glue
- Small tray
- Paper towel
How to Make It
- Clean and dry the pumpkin.
- Sort your pom-poms by size or color.
- Add a small dot of glue to the pumpkin.
- Press a pom-pom into place.
- Continue adding pom-poms around the surface.
- Mix different sizes for a playful look.
- Let the glue dry completely.
Time Needed: 20–30 minutes
Difficulty: Easy
Helpful Tip: Leave a little space between some pom-poms so the pumpkin does not become visually crowded.
7. Googly Eye Pumpkin
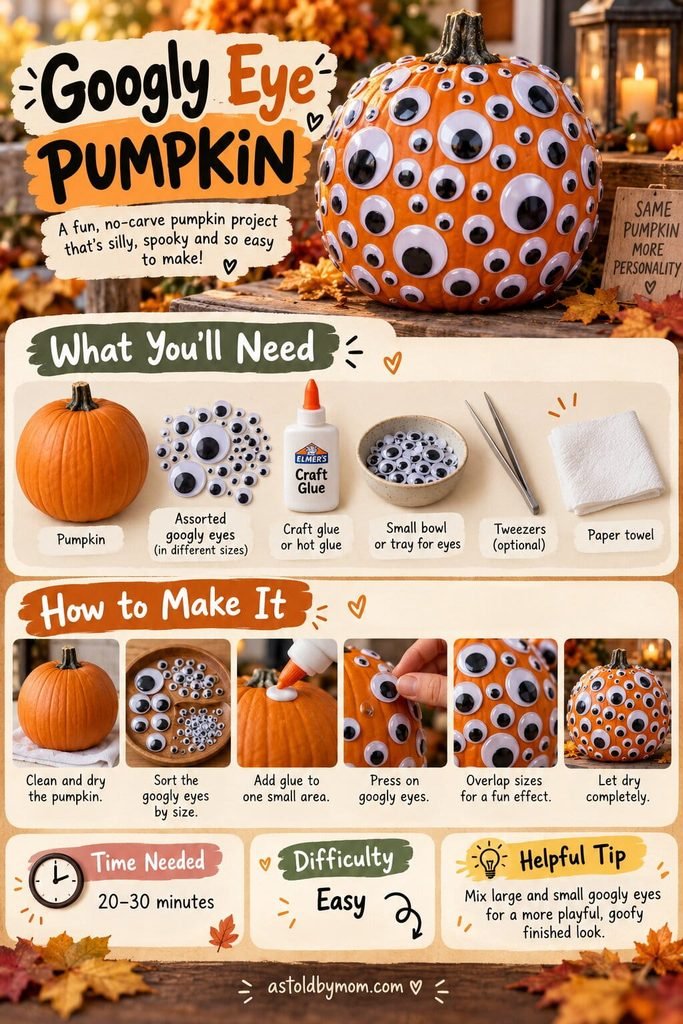
Few supplies are needed for this wonderfully silly Halloween pumpkin.
The more mismatched the eyes, the better.
What You’ll Need
- Pumpkin
- Googly eyes in several sizes
- Craft glue
- Small bowl or tray
- Paper towel
How to Make It
- Clean and dry the pumpkin.
- Arrange a few large googly eyes first.
- Glue them into place.
- Fill the spaces around them with smaller eyes.
- Continue until you have the amount of coverage you want.
- Let everything dry.
Time Needed: 15–25 minutes
Difficulty: Easy
Helpful Tip: Mix tiny, medium, and oversized eyes for the funniest effect.
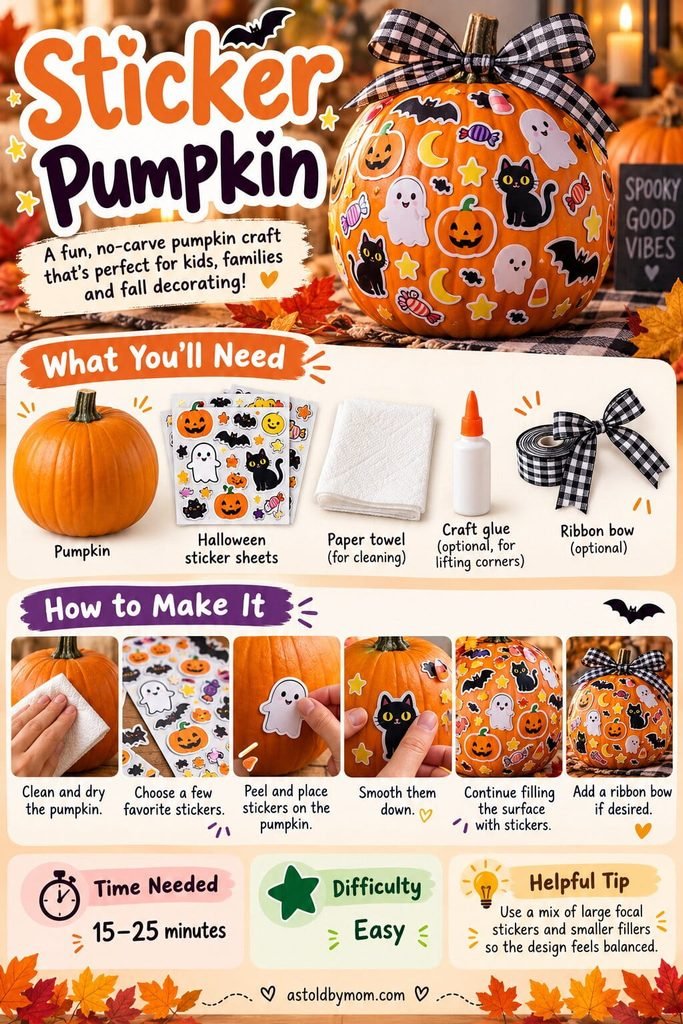
8. Sticker Pumpkin
This may be the easiest project in the entire collection.
Halloween sticker sheets make it simple for kids to decorate pumpkins almost entirely on their own.
What You’ll Need
- Pumpkin
- Halloween stickers
- Paper towel
- Craft glue, optional
- Ribbon bow, optional
How to Make It
- Clean and dry the pumpkin.
- Choose a selection of stickers.
- Place the largest stickers first.
- Fill empty areas with smaller designs.
- Smooth each sticker firmly against the pumpkin.
- Add a decorative bow if desired.
Time Needed: 15–25 minutes
Difficulty: Easy
Helpful Tip: Use larger stickers as focal points and smaller stickers as fillers.
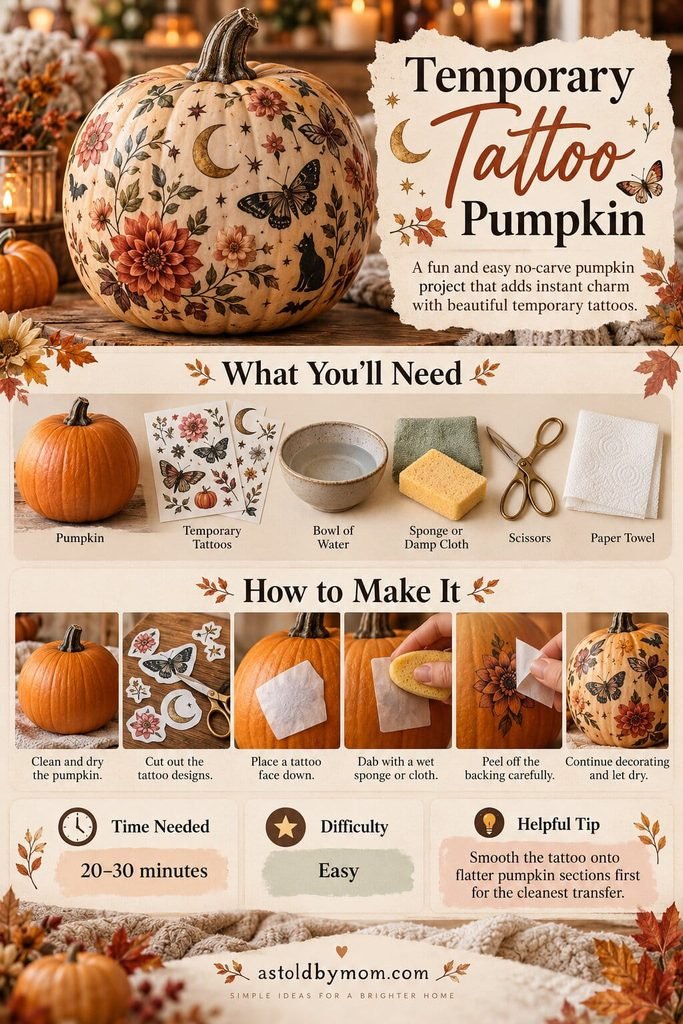
9. Temporary Tattoo Pumpkin
Temporary tattoos are surprisingly effective on pumpkins and can create beautifully detailed designs with very little artistic skill required.
What You’ll Need
- Pumpkin
- Temporary tattoos
- Bowl of water
- Damp sponge or cloth
- Scissors
- Paper towel
How to Make It
- Clean and dry the pumpkin.
- Cut out your chosen tattoo designs.
- Remove the clear protective sheet.
- Place the tattoo face down on the pumpkin.
- Press a damp sponge over the backing.
- Hold for the recommended transfer time.
- Carefully peel away the paper.
- Continue around the pumpkin and let it dry.
Time Needed: 20–30 minutes
Difficulty: Easy
Helpful Tip: Apply tattoos to flatter sections of the pumpkin first for cleaner transfers.
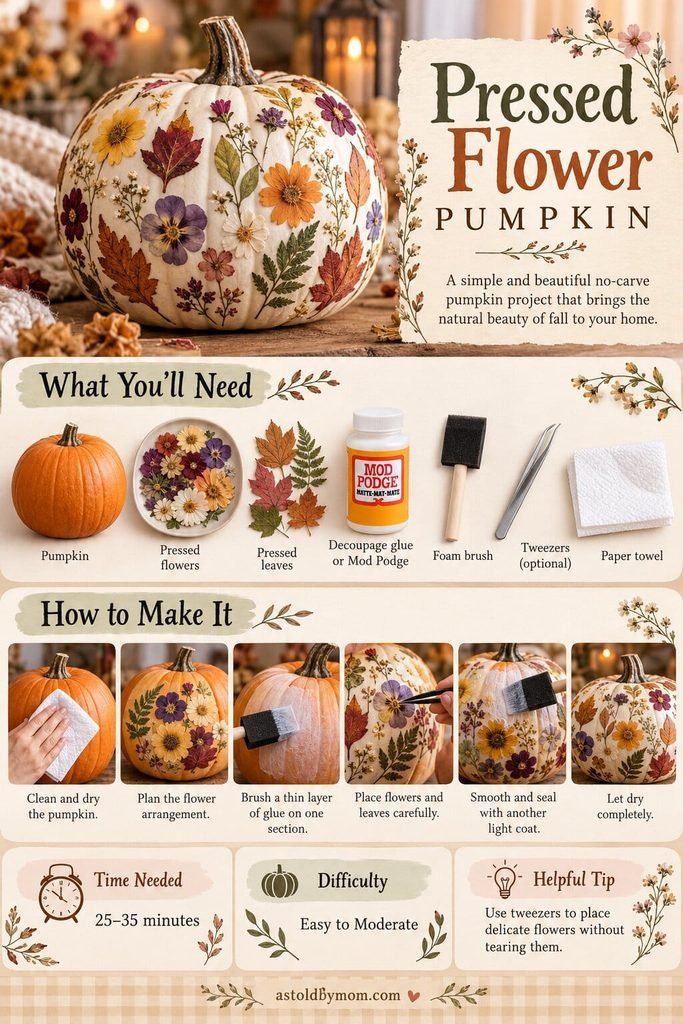
10. Pressed Flower Pumpkin
Pressed flowers and leaves create a softer, botanical pumpkin that works just as well for fall decorating as it does for Halloween.
What You’ll Need
- Pumpkin
- Pressed flowers
- Pressed leaves
- Decoupage glue
- Foam brush
- Tweezers
- Paper towel
How to Make It
- Clean and dry the pumpkin.
- Arrange your flowers before gluing.
- Brush a small amount of decoupage glue onto the pumpkin.
- Carefully place each flower or leaf.
- Smooth it gently.
- Add a thin protective layer of decoupage glue over the top.
- Continue around the pumpkin.
- Let everything dry.
Time Needed: 30–45 minutes
Difficulty: Easy to Moderate
Helpful Tip: Use tweezers for delicate dried flowers so the petals do not tear.
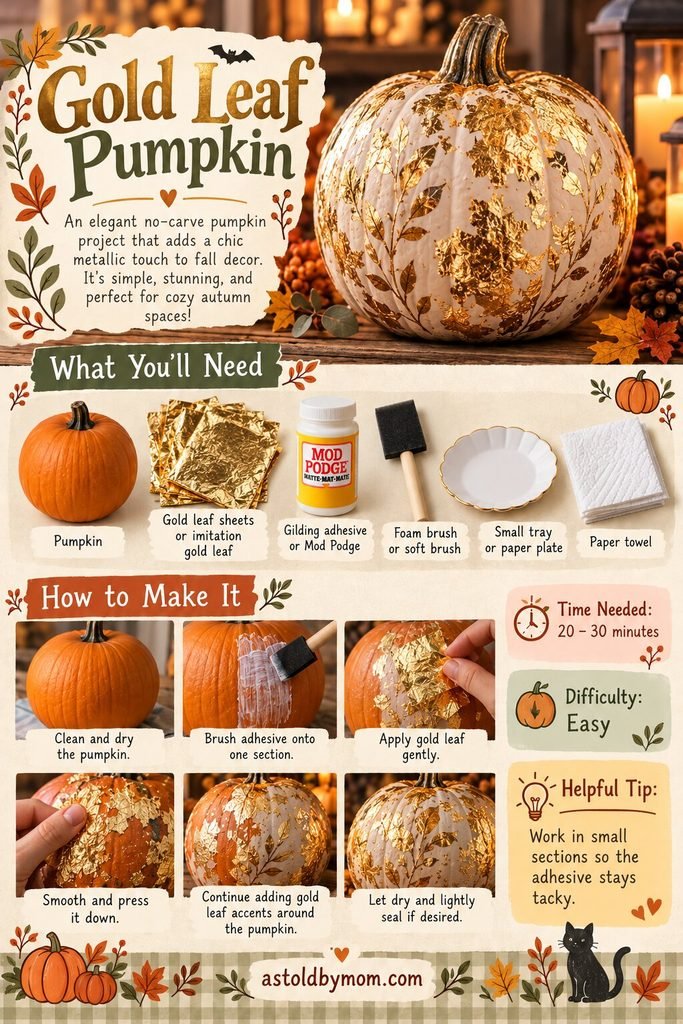
11. Gold Leaf Pumpkin
Gold leaf makes an ordinary white pumpkin look instantly elegant.
The imperfect, slightly cracked metallic finish is actually part of the charm.
What You’ll Need
- White pumpkin
- Gold leaf sheets or flakes
- Gold leaf adhesive or craft glue
- Foam brush
- Soft brush
- Small tray
- Paper towel
How to Make It
- Clean and dry the pumpkin.
- Brush adhesive onto one small section.
- Wait until it becomes tacky if required.
- Press gold leaf onto the adhesive.
- Smooth it gently with a soft brush.
- Brush away loose pieces.
- Continue around the pumpkin.
- Let everything dry.
Time Needed: 20–30 minutes
Difficulty: Easy
Helpful Tip: Work in small areas because gold leaf is easiest to apply while the adhesive remains tacky.
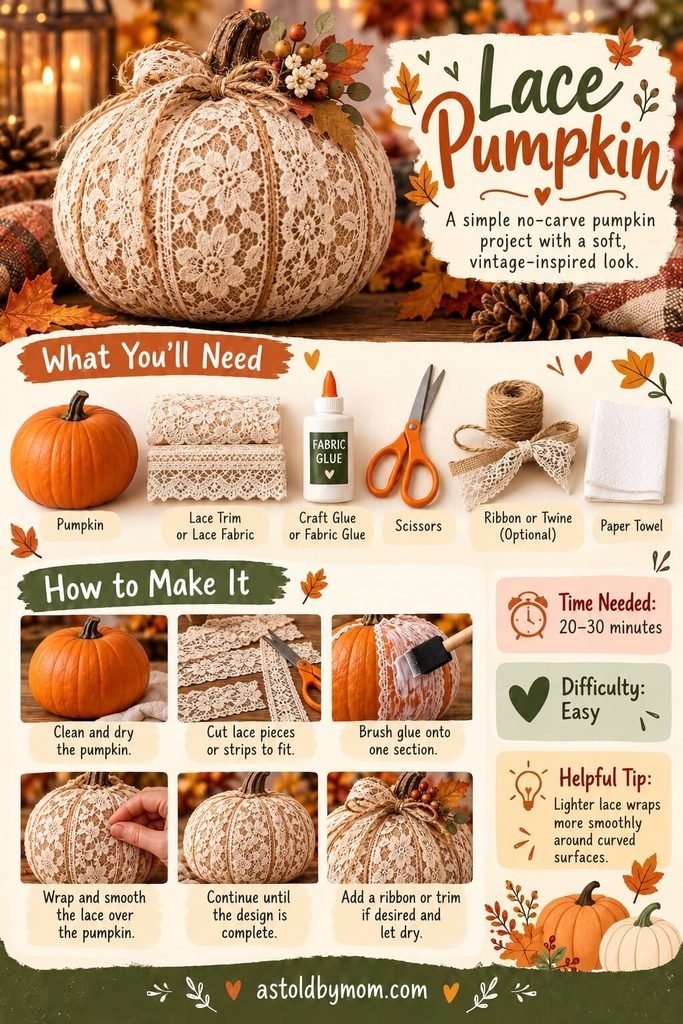
12. Lace Pumpkin
A layer of lace creates a vintage-inspired pumpkin that feels soft and elegant rather than spooky.
What You’ll Need
- Pumpkin
- Lace fabric or lace trim
- Craft glue or fabric glue
- Scissors
- Ribbon or twine, optional
- Paper towel
How to Make It
- Clean and dry the pumpkin.
- Measure and cut pieces of lace.
- Brush glue onto one section.
- Lay the lace over the pumpkin.
- Smooth it carefully around the curves.
- Continue adding lace until the design is complete.
- Finish with ribbon or twine near the stem if desired.
Time Needed: 20–30 minutes
Difficulty: Easy
Helpful Tip: Lightweight lace conforms to pumpkin curves much better than stiff fabric.
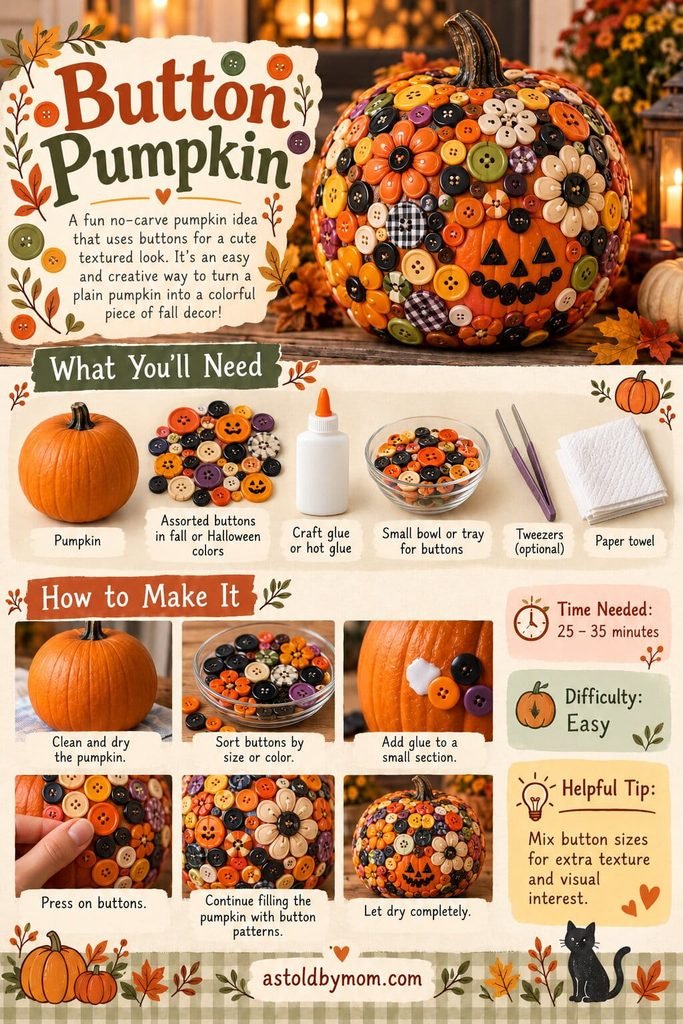
13. Button Pumpkin
Colorful buttons create lots of texture and are perfect for a cheerful Halloween craft.
What You’ll Need
- Pumpkin
- Buttons in assorted sizes and colors
- Craft glue or hot glue
- Small tray
- Tweezers, optional
- Paper towel
How to Make It
- Clean and dry the pumpkin.
- Sort your buttons by size or color.
- Add glue to a small area.
- Press buttons into place.
- Mix larger and smaller buttons.
- Continue creating rows, clusters, or random patterns.
- Let the glue dry completely.
Time Needed: 25–35 minutes
Difficulty: Easy
Helpful Tip: Mixing different button sizes creates more interesting texture.
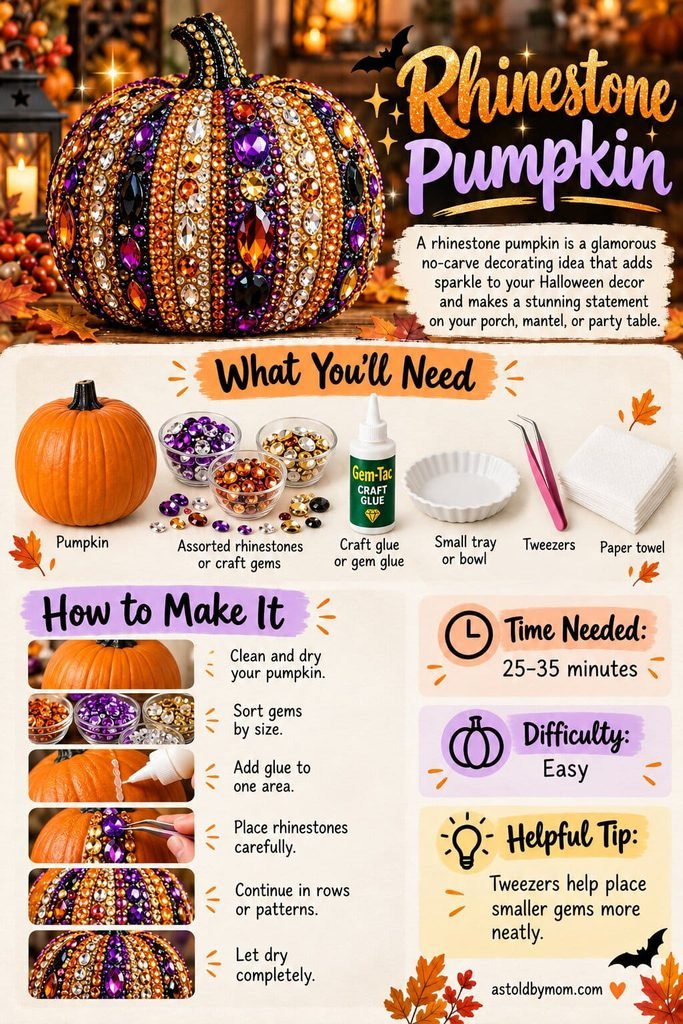
14. Rhinestone Pumpkin
If you like Halloween decor with plenty of sparkle, decorate your pumpkin with gems and rhinestones.
What You’ll Need
- Pumpkin
- Assorted rhinestones or craft gems
- Craft glue or gem glue
- Small tray
- Tweezers
- Paper towel
How to Make It
- Clean and dry the pumpkin.
- Sort the rhinestones by size or color.
- Add glue to a small section.
- Place the gems carefully using tweezers.
- Continue in rows, clusters, or patterns.
- Decorate the stem if desired.
- Allow the glue to dry completely.
Time Needed: 25–35 minutes
Difficulty: Easy
Helpful Tip: Tweezers make tiny rhinestones much easier to position neatly.
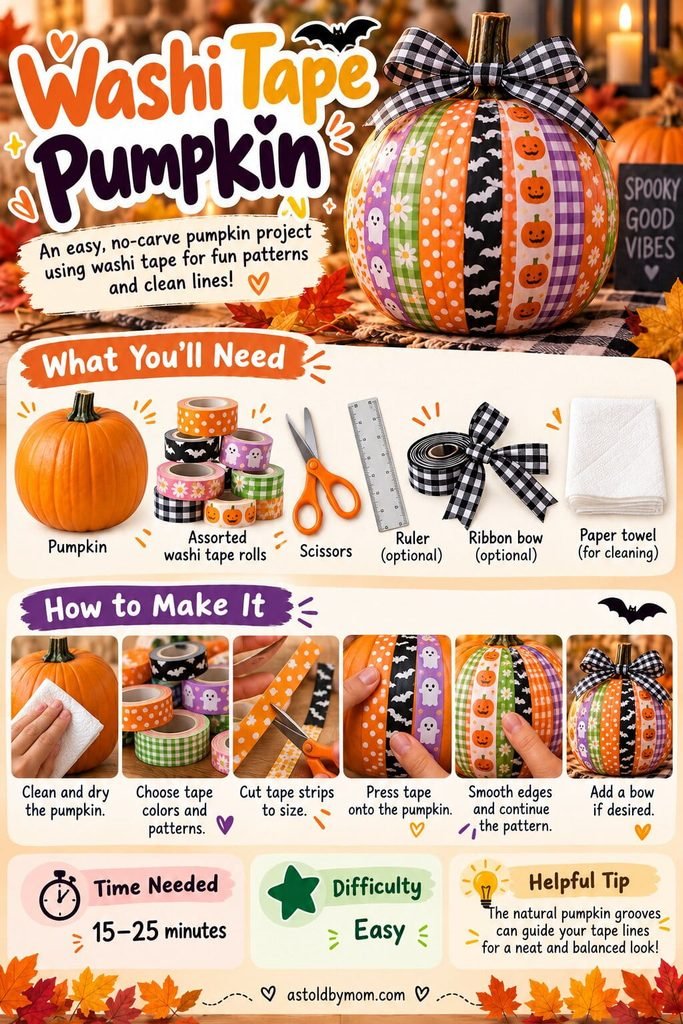
15. Washi Tape Pumpkin
Decorative tape makes it incredibly easy to create clean patterns without paint.
What You’ll Need
- Pumpkin
- Assorted washi tape
- Scissors
- Ruler, optional
- Ribbon bow, optional
- Paper towel
How to Make It
- Clean and dry the pumpkin.
- Choose several tape colors and patterns.
- Cut strips to the required length.
- Press them vertically or horizontally onto the pumpkin.
- Smooth down the edges.
- Continue alternating designs.
- Finish with a bow if desired.
Time Needed: 15–25 minutes
Difficulty: Easy
Helpful Tip: Use the natural grooves of the pumpkin as guides for your tape.
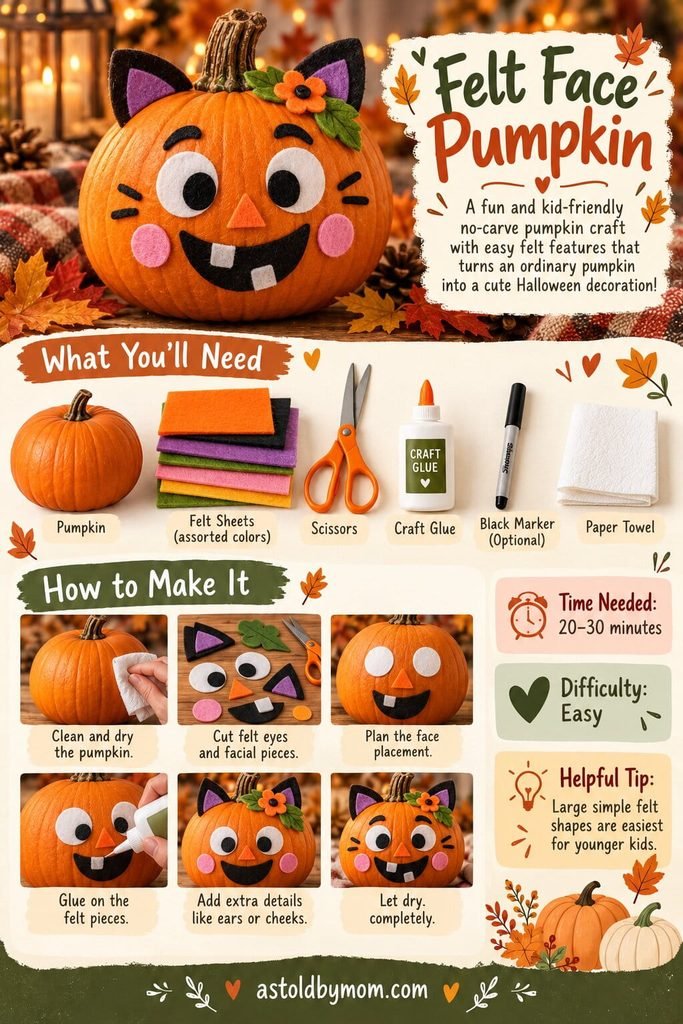
16. Felt Face Pumpkin
Felt lets you create adorable faces without painting.
Cats, witches, monsters, ghosts, and silly characters all work well.
What You’ll Need
- Pumpkin
- Felt sheets
- Scissors
- Craft glue
- Black marker, optional
- Paper towel
How to Make It
- Clean and dry the pumpkin.
- Cut eyes, ears, a nose, mouth, cheeks, and other pieces from felt.
- Arrange everything before gluing.
- Glue each piece onto the pumpkin.
- Add ears, flowers, whiskers, or other details.
- Let everything dry completely.
Time Needed: 20–30 minutes
Difficulty: Easy
Helpful Tip: Large simple shapes are easiest for younger kids to cut and assemble.
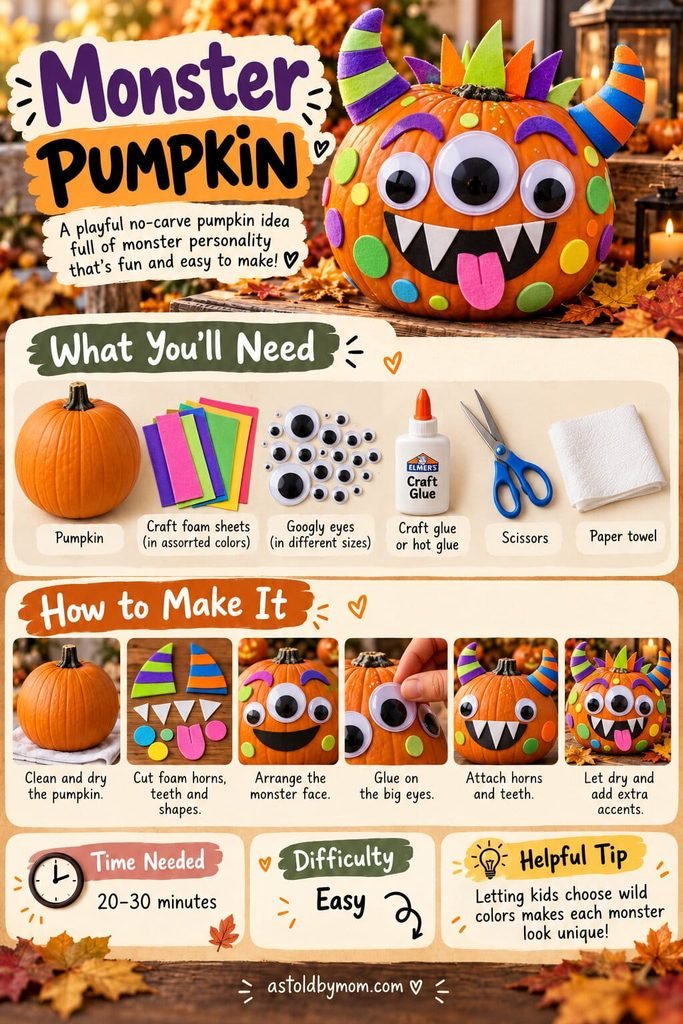
17. Monster Pumpkin
There are no rules with this one.
Oversized eyes, striped horns, colorful spots, funny teeth, and wild accessories only make the monster better.
What You’ll Need
- Pumpkin
- Craft foam sheets
- Large googly eyes
- Scissors
- Craft glue
- Black marker
- Colorful craft accessories
How to Make It
- Clean and dry the pumpkin.
- Cut horns, ears, teeth, spots, and other shapes from craft foam.
- Arrange the facial features.
- Glue the eyes into place.
- Add the mouth, teeth, horns, and ears.
- Finish with colorful spots or funny accessories.
- Let everything dry.
Time Needed: 20–30 minutes
Difficulty: Easy
Helpful Tip: Mismatched features make monster pumpkins even more entertaining.
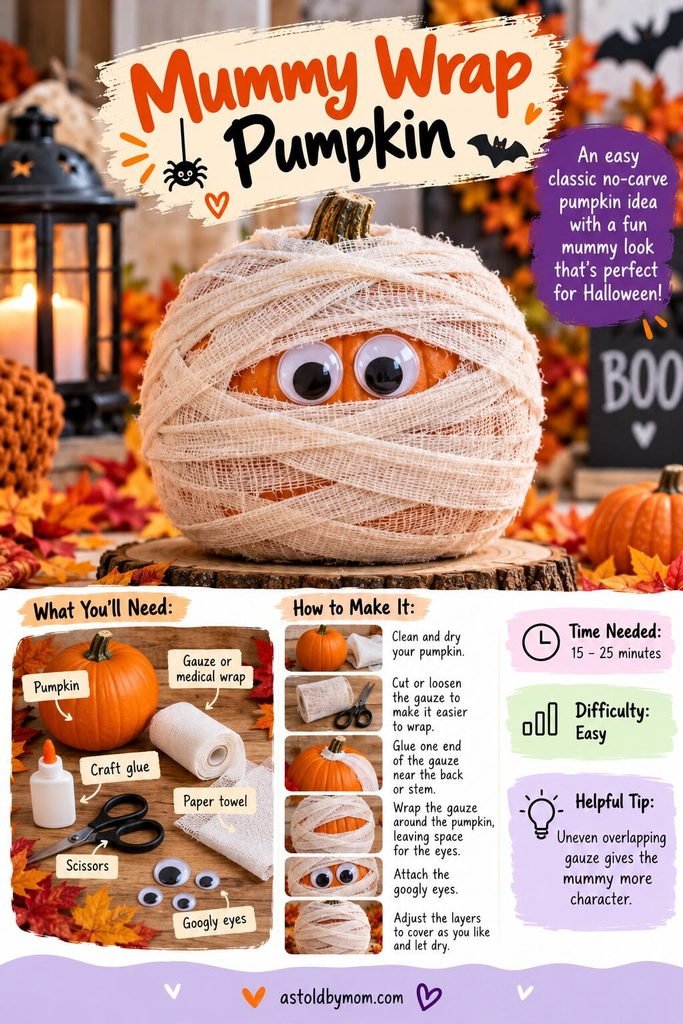
18. Mummy Wrap Pumpkin
A little gauze and two big eyes are all you need to create this classic Halloween character.
What You’ll Need
- Pumpkin
- Gauze or medical wrap
- Large googly eyes
- Craft glue
- Scissors
- Paper towel
How to Make It
- Clean and dry the pumpkin.
- Cut or loosen several strips of gauze.
- Glue one end near the back or stem.
- Wrap the gauze around the pumpkin.
- Leave a small opening for the eyes.
- Glue on two large googly eyes.
- Adjust the bandage layers.
- Let the glue dry.
Time Needed: 15–25 minutes
Difficulty: Easy
Helpful Tip: Uneven overlapping bandages make the mummy look better than perfectly straight ones.
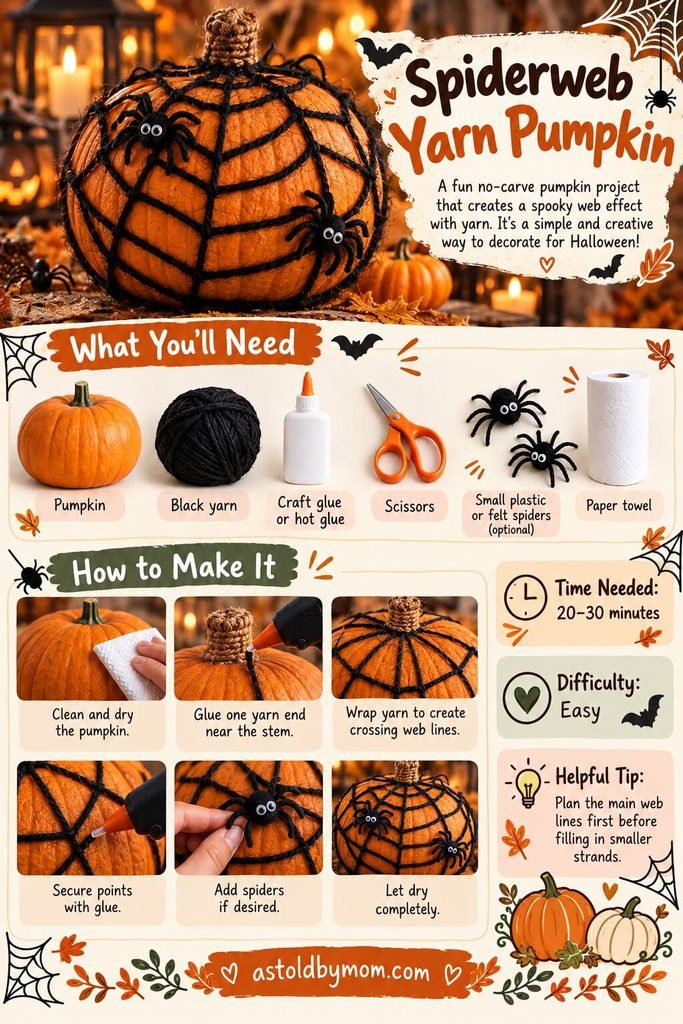
19. Spiderweb Yarn Pumpkin
Black yarn creates an instant spiderweb when crisscrossed around an orange pumpkin.
What You’ll Need
- Pumpkin
- Black yarn
- Craft glue or hot glue
- Scissors
- Plastic or felt spiders, optional
- Paper towel
How to Make It
- Clean and dry the pumpkin.
- Secure one end of the yarn near the stem.
- Wrap the yarn diagonally around the pumpkin.
- Crisscross additional strands to form a web.
- Secure loose points with glue.
- Add a plastic or felt spider.
- Let everything dry.
Time Needed: 20–30 minutes
Difficulty: Easy
Helpful Tip: Start with a loose web and tighten individual strands after you like the pattern.
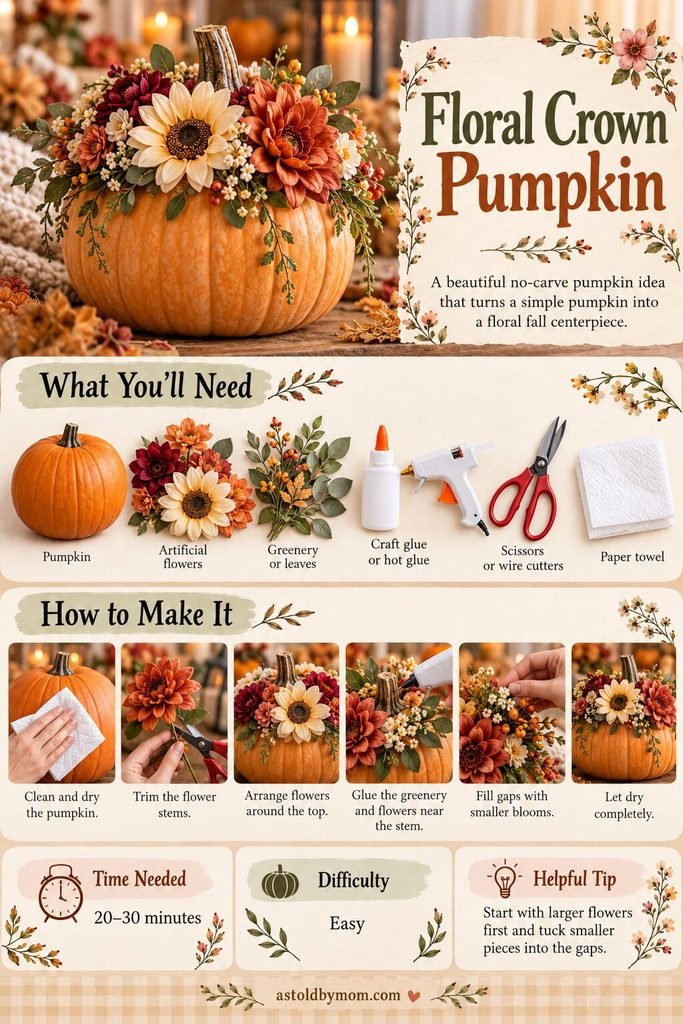
20. Floral Crown Pumpkin
A crown of artificial flowers transforms a pumpkin into an eye-catching centerpiece.
What You’ll Need
- Pumpkin
- Artificial flowers
- Artificial greenery
- Craft glue or hot glue
- Scissors or wire cutters
- Paper towel
How to Make It
- Clean and dry the pumpkin.
- Trim long flower stems.
- Arrange the largest flowers around the stem.
- Glue greenery into place.
- Add the larger blooms.
- Fill the gaps with smaller flowers and berries.
- Let everything dry.
Time Needed: 20–30 minutes
Difficulty: Easy
Helpful Tip: Start with your largest flowers and fill the empty spaces afterward.
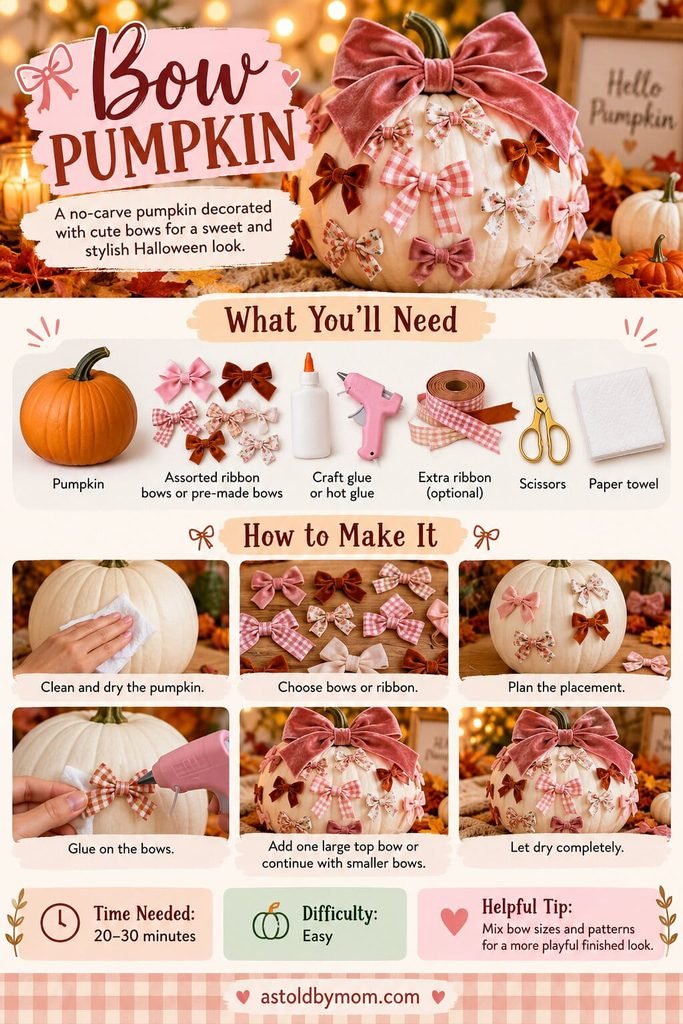
21. Bow Pumpkin
Tiny bows give a pumpkin a sweet, playful look, while one oversized bow at the top creates an instant statement.
What You’ll Need
- Pumpkin
- Premade ribbon bows
- Extra ribbon, optional
- Craft glue or hot glue
- Scissors
- Paper towel
How to Make It
- Clean and dry the pumpkin.
- Choose bows in different colors, sizes, and patterns.
- Arrange them before gluing.
- Glue the smaller bows around the pumpkin.
- Add one large bow near the stem.
- Let everything dry completely.
Time Needed: 20–30 minutes
Difficulty: Easy
Helpful Tip: Mixing bow sizes and patterns gives the pumpkin more personality.
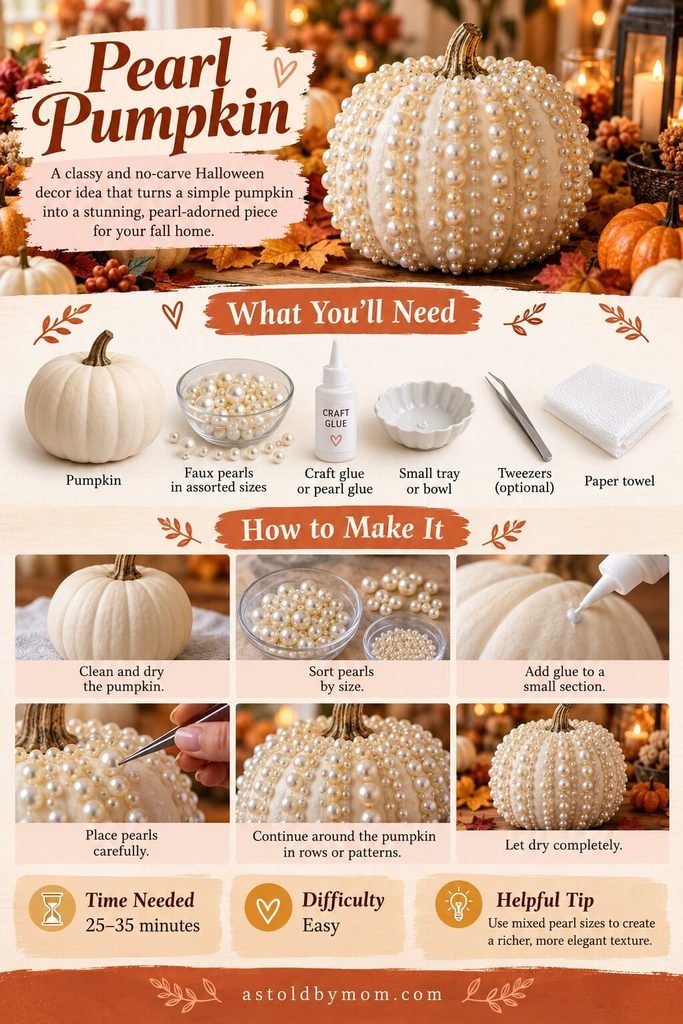
22. Pearl Pumpkin
Rows of faux pearls create one of the most elegant no-carve pumpkins in this collection.
What You’ll Need
- White pumpkin
- Faux pearls in assorted sizes
- Craft glue or pearl glue
- Small tray
- Tweezers
- Paper towel
How to Make It
- Clean and dry the pumpkin.
- Sort the pearls by size.
- Add glue to a small section.
- Place larger pearls first.
- Fill gaps with smaller pearls.
- Continue following the natural pumpkin grooves.
- Let everything dry completely.
Time Needed: 25–35 minutes
Difficulty: Easy
Helpful Tip: Using several pearl sizes creates a richer, more detailed texture.
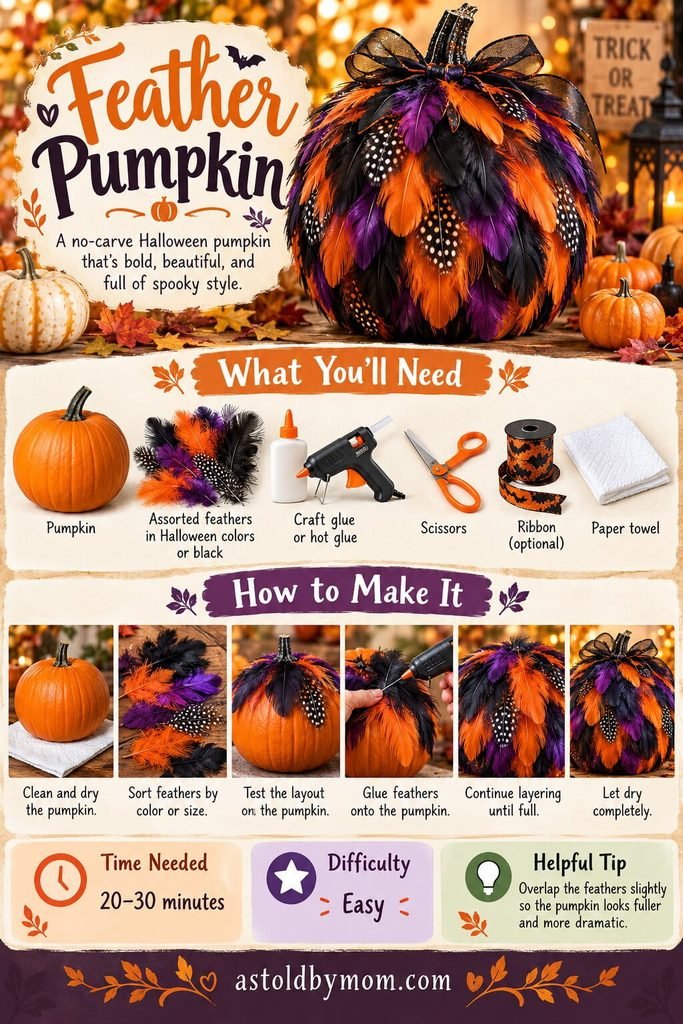
23. Feather Pumpkin
Orange, purple, and black feathers make this pumpkin dramatic, fluffy, and unmistakably Halloween.
What You’ll Need
- Pumpkin
- Assorted feathers
- Craft glue or hot glue
- Scissors
- Ribbon, optional
- Paper towel
How to Make It
- Clean and dry the pumpkin.
- Sort the feathers by color and size.
- Test the arrangement before gluing.
- Begin attaching feathers near the bottom.
- Overlap the next layer slightly.
- Continue until the pumpkin is covered.
- Add ribbon near the stem if desired.
Time Needed: 20–30 minutes
Difficulty: Easy
Helpful Tip: Slightly overlapping each feather gives the pumpkin a fuller appearance.
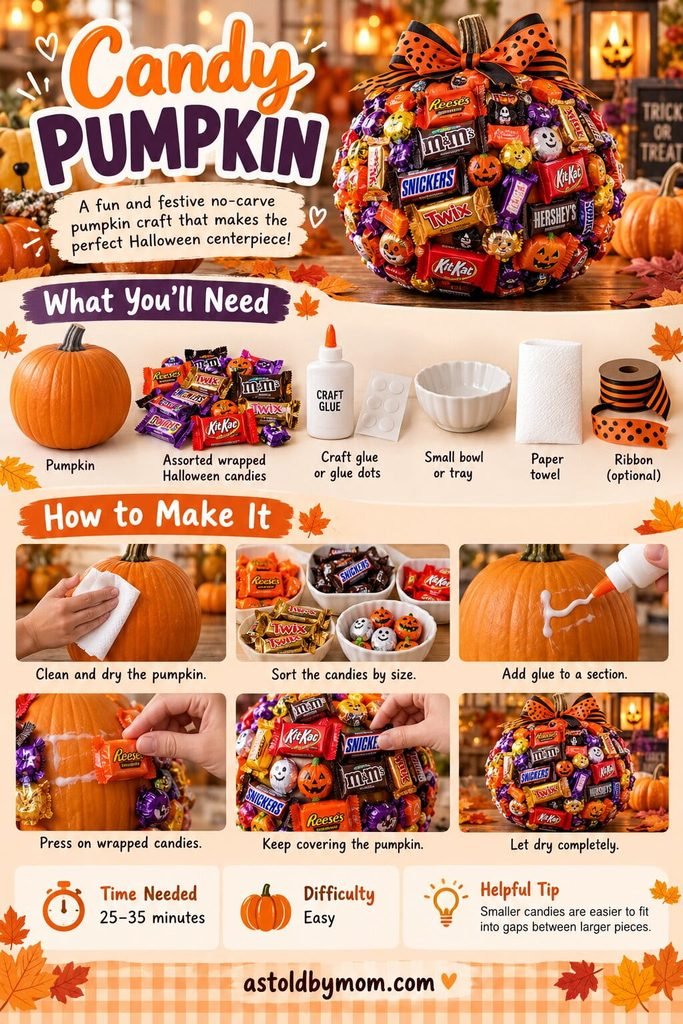
24. Candy Pumpkin
This fun pumpkin doubles as a colorful Halloween party decoration.
Use individually wrapped candies so everything stays clean.
What You’ll Need
- Pumpkin
- Assorted wrapped Halloween candy
- Craft glue or glue dots
- Small tray
- Ribbon, optional
- Paper towel
How to Make It
- Clean and dry the pumpkin.
- Sort candy by size and shape.
- Add glue or a removable glue dot to one section.
- Press the wrapped candies into place.
- Continue filling the surface.
- Use smaller candies to fill gaps.
- Add a bow near the stem if desired.
Time Needed: 25–35 minutes
Difficulty: Easy
Helpful Tip: Glue only to the wrappers, never directly onto exposed candy.
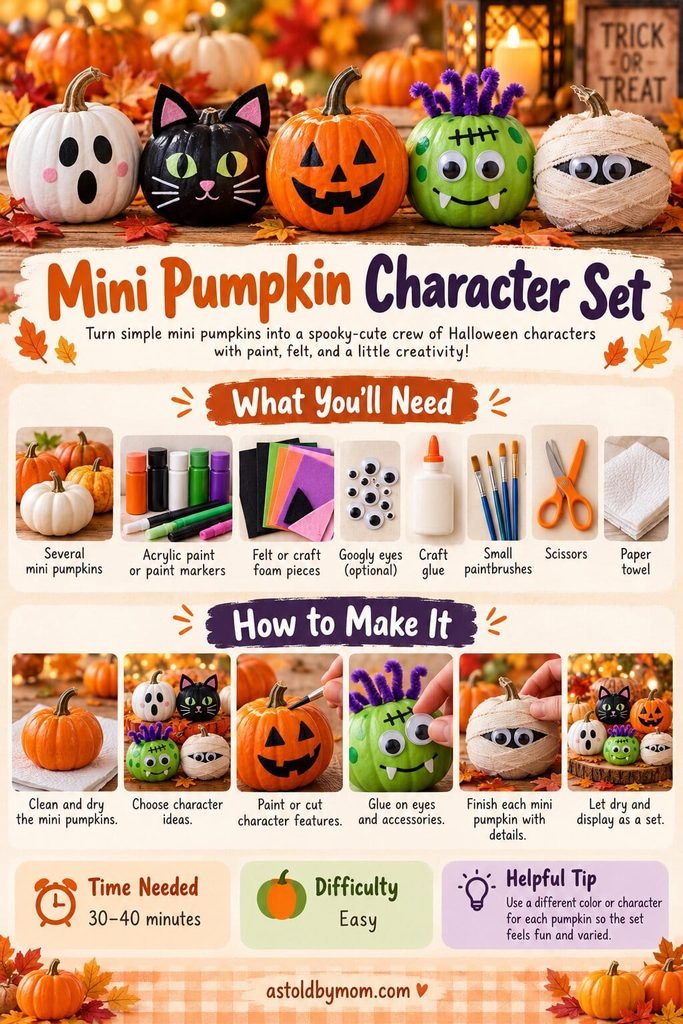
25. Mini Pumpkin Character Set
Why decorate just one pumpkin when you can create an entire Halloween crew?
Mini pumpkins are perfect for ghosts, cats, monsters, jack-o’-lanterns, mummies, witches, and other little characters.
What You’ll Need
- Several mini pumpkins
- Acrylic paint or paint markers
- Felt or craft foam
- Googly eyes
- Craft glue
- Small paintbrushes
- Scissors
- Paper towel
How to Make It
- Clean and dry all the mini pumpkins.
- Decide which character each pumpkin will become.
- Paint basic colors and facial features.
- Cut ears, hair, hats, teeth, or other accessories from felt or craft foam.
- Glue on googly eyes and decorations.
- Give each pumpkin slightly different details.
- Let everything dry.
- Arrange the finished pumpkins together as a set.
Time Needed: 30–40 minutes
Difficulty: Easy
Helpful Tip: Use a different color or character for every pumpkin so the collection feels varied and fun.
Tips for Making No-Carve Pumpkins Last Longer
A few simple steps can help your decorated pumpkins stay looking good throughout the season.
Choose pumpkins without soft spots, cracks, or damaged stems.
Clean the surface before decorating so glue, tape, stickers, and other materials stick properly.
Keep finished pumpkins away from excessive moisture and direct heat.
If you are using real pumpkins outdoors, bringing them inside during very warm or wet weather may help them last longer.
Artificial craft pumpkins are another great option if you want to reuse your creation next year.
No-Carve Pumpkin Ideas for Kids
Many of these projects are particularly easy for children.
Good choices include:
- Pom-Pom Pumpkin
- Googly Eye Pumpkin
- Sticker Pumpkin
- Felt Face Pumpkin
- Monster Pumpkin
- Mummy Wrap Pumpkin
- Washi Tape Pumpkin
- Mini Pumpkin Character Set
Adults should handle hot glue guns, sharp scissors, wire cutters, and other tools that are not suitable for the child’s age.
No-Carve Pumpkin Ideas for Elegant Fall Decor
Not every Halloween pumpkin needs to be spooky.
For something that works with regular fall decor, try:
- Gold Leaf Pumpkin
- Lace Pumpkin
- Pressed Flower Pumpkin
- Floral Crown Pumpkin
- Pearl Pumpkin
- Fabric-Covered Pumpkin
- Ribbon-Wrapped Pumpkin
These can easily stay on display throughout the fall season.
Final Thoughts
There are so many fun ways to decorate pumpkins without carving them.
You can cover them in ribbon, wrap them in yarn, add flowers, glue on buttons, create silly monsters, make elegant pearl designs, or turn an entire collection of mini pumpkins into Halloween characters.
Choose one project for a quick afternoon craft or make several different pumpkins and combine them into a colorful Halloween display.
And if you want even more pumpkin inspiration, take a look at our easy pumpkin painting ideas and pumpkin carving ideas for even more ways to decorate this Halloween.


